Trading Bridge: Setting Up Automated Trading
The SkyAnalyst Trading Bridge connects your AI-generated trade signals to your local trading platform (cTrader and MetaTrader 5). It is a Windows desktop application that acts as a relay: when your monitored trades trigger entry conditions, the bridge forwards the signal to a bot running inside your trading platform, which places the order.
📥 Download Trading Bridge for Windows — Save the
.exeand follow the Installation section below.
Important: The Trading Bridge is a BETA feature. Always test with demo accounts before enabling automated execution on live capital. The current minimum supported bridge version is v1.46.
What is the Trading Bridge
A desktop application for Windows that:
- Runs on your local machine alongside your trading platform
- Receives trade signals from SkyAnalyst when entry conditions are met
- Forwards signals to your cTrader or MetaTrader 5 bot
- Enables fully automated trade execution from AI analysis to platform entry
The bridge itself does not execute trades. It relays signals to a bot that lives inside your trading platform, and the bot handles the actual order placement.
System Requirements
| Requirement | Details |
|---|---|
| Operating System | Windows 10 or later |
| Trading Platform | cTrader and/or MetaTrader 5 |
| Bridge Version | v1.46 or later (heartbeat every 20s, see below) |
| Internet Connection | Required, always-on, wired recommended |
| SkyAnalyst Account | Active subscription with automation access |
Installation
Step 1: Download the Desktop App
- Open Settings in SkyAnalyst AI (gear icon in the sidebar)
- Scroll to the SkyAnalyst Trading Bridge section (marked BETA)
- Click "Download for Windows"
- Save the installer (
SkyAnalyst-Trading-Bridge.exe) to your computer
Step 2: Install on Windows
- Run the downloaded
SkyAnalyst-Trading-Bridge.exe - The first-run wizard detects that the .exe is in your Downloads folder and offers to install it to
%LocalAppData%\SkyAnalystBridge\. Accept the default and check "Create desktop shortcut". - The installer copies the executable, registers the bundled cTrader bot file, creates the shortcut, and relaunches the bridge from its permanent location.
- The bridge starts and waits for a pairing code.
Why this matters: running directly from Downloads is fine, but you will lose the .exe the next time you clear the folder. The wizard's one-click install keeps the bridge in a stable location and prevents Windows from quarantining a "downloaded executable" on every launch.
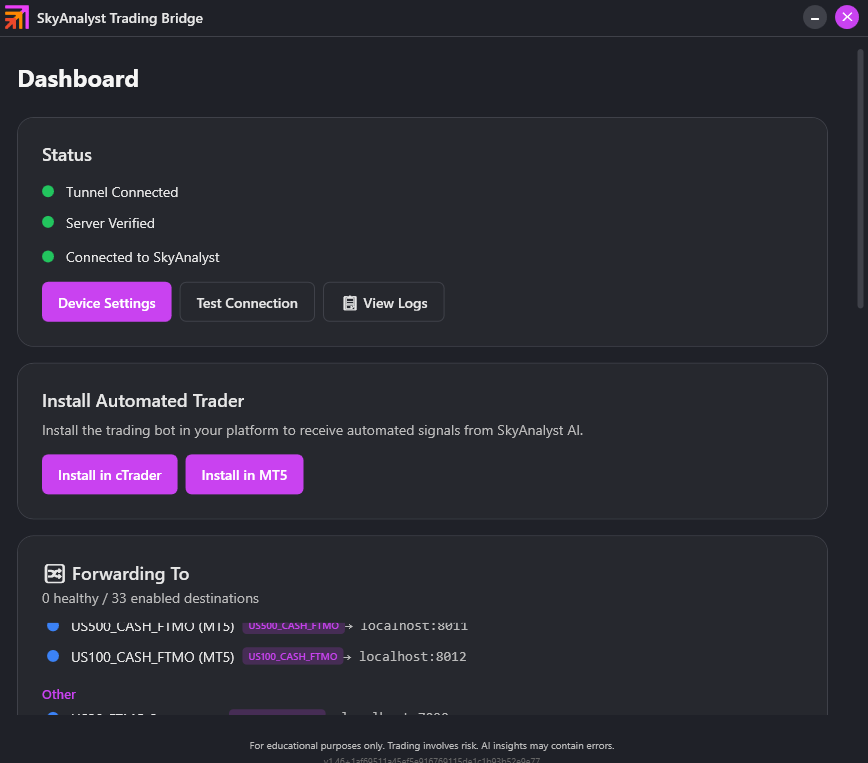
Pairing Your Device
The pairing process creates a secure connection between your SkyAnalyst web account and your desktop Trading Bridge app.
Step 1: Generate a Pairing Code
- In the SkyAnalyst web app, go to Settings -> Trading Bridge
- Click "Generate Pairing Code"
- A code in
XXXX-YYYYformat appears with a 10-minute countdown timer - Copy the code (click the copy button or select and copy)
Pairing codes use a 32-character alphabet (no ambiguous 0/O or 1/I) and are single-use. There are over a trillion possible codes, but they expire in 10 minutes, so generate fresh ones close to the moment you enter them.
Step 2: Enter the Code in the Bridge App
- Open the SkyAnalyst Trading Bridge desktop application
- Enter the pairing code displayed in your browser (case-insensitive, dashes optional)
- The Bridge app validates the code with the SkyAnalyst relay and establishes the connection
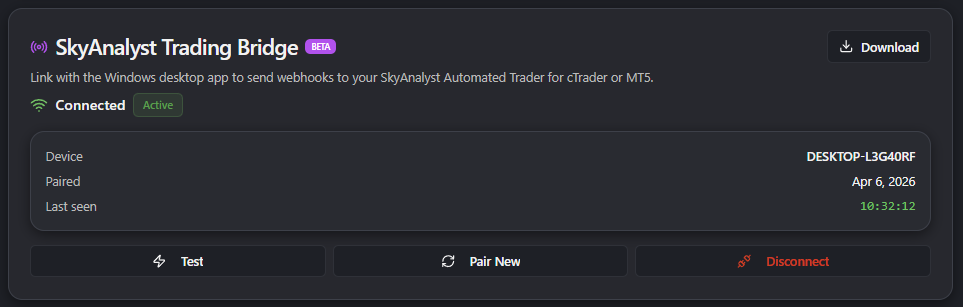
Step 3: Verify Connection
Once paired successfully:
- The web app shows a "Connected" status with your device name
- Last seen timestamp updates in real time
- You can test the connection using the "Test Connection" button, which sends a non-trading
connection_testpayload through the relay and measures round-trip latency
Pro Tip: Pairing codes expire after 10 minutes and can only be used once. If a code expires, simply generate a new one. You can pair up to 3 devices per account.
Installing Trading Bots
Once your Trading Bridge is connected, you need a bot running inside your trading platform that listens for signals from the bridge. The bridge does not place orders directly; it forwards each signal to a bot, and the bot places the order on your broker account.
cTrader workspace with the SkyAnalyst Automated Trader bot in the Active state
cTrader Bot Installation
The cTrader bot is bundled with the desktop bridge and installed in one click.
Prerequisites
- cTrader Desktop installed and signed in to your broker account.
- A broker that supports cTrader Algo (cBot) automated trading. Pepperstone is the reference broker used in the bundled defaults; IC Markets, FP Markets, and other cTrader brokers also work. Check that your broker allows API/cBot trading on the account type you are using.
- An account with sufficient balance and the right leverage for the lot sizes you plan to trade. The bot computes lot size from the AI's recommended risk percentage, not from a fixed lot.
- "Allow automated trading" enabled in cTrader (one-time toggle in the platform's preferences).
Step 1: Locate the bot file
When you installed the bridge, the bundled bot file was copied alongside the executable:
%LocalAppData%\SkyAnalystBridge\SkyAnalyst Automated Trader.algo
You can also re-install it from the bridge dashboard at any time via the Install Automated Trader -> Install in cTrader button. That button extracts the .algo file from the bridge installation and opens it with cTrader.
Step 2: Import the bot into cTrader
- Double-click
SkyAnalyst Automated Trader.algo, OR click Install in cTrader in the bridge dashboard. - cTrader opens an import dialog: confirm the import.
- The bot appears in the cTrader Algo tab under cBots -> SkyAnalyst Automated Trader.
If Windows shows "How would you like to open this file?", cTrader is not yet installed or not associated with .algo files. Open cTrader first, then re-run the install.
Step 3: Attach the bot to a chart per instrument
Each running bot instance listens on its own local port and handles one instrument. The bridge ships with bundled default ports, one per instrument:
| Port | Instrument (cTrader) | Routing Key |
|---|---|---|
| 8050 | US30 (Pepperstone) | US30-Pepperstone |
| 8051 | NAS100 (Pepperstone) | NAS100-Pepperstone |
| 8052 | US500 (Pepperstone) | US500-Pepperstone |
| 8053 | XAUUSD (Pepperstone) | XAUUSD-Pepperstone |
| 8054 | EURUSD (Pepperstone) | EURUSD-Pepperstone |
| 8055 | USDJPY (Pepperstone) | USDJPY-Pepperstone |
| 8056 | BTCUSD (Pepperstone) | BTCUSD-Pepperstone |
| 8057 | AUDUSD (Pepperstone) | AUDUSD-Pepperstone |
| 8058 | USDCAD (Pepperstone) | USDCAD-Pepperstone |
| 8059 | GBPUSD (Pepperstone) | GBPUSD-Pepperstone |
| 8060 | US30_CASH_FTMO | US30_CASH_FTMO |
| 8061 | US500_CASH_FTMO | US500_CASH_FTMO |
| 8062 | US100_CASH_FTMO | US100_CASH_FTMO |
For each instrument you want to automate:
- Open the cTrader chart for that exact symbol (e.g., US30 on your Pepperstone account).
- Drag SkyAnalyst Automated Trader from the cBots panel onto the chart.
- In the bot's parameters, configure the key inputs (see Bot Inputs below). At minimum, pick your Symbol from the dropdown — the Listening Port auto-configures from the table above (e.g.
8050for US30). - Click Start. The bot status flips to Running (green).
You can run multiple instances of the bot in parallel, each on its own chart and its own port.
Bot Inputs (cTrader v2.61)
The cTrader bot's parameters mirror the MT5 EA's inputs. The most important ones:
- Symbol (required) — pick from the dropdown. Auto-configures the Listening Port.
- Risk Source (default
Bot) —Botuses your Fixed Risk;Appuses the AI'sposition_size_pctfrom the webhook. - TP Source (default
Bot) — same idea for take-profit % allocation. - Fixed Risk Unit (default
Percent) — choose between percent-of-balance or dollar amount. - Fixed Risk (%) (default
1.0) — risk per trade when Risk Source = Bot. Must be > 0 and ≤ Max Risk Cap. - Max Risk Cap (default
Cap_5pct, choices: 5/10/15/20/25/30%) — the hard ceiling that caps BOTH your bot's Fixed Risk AND anyposition_size_pctarriving from SkyAnalyst. App over cap → trade is rejected; Bot over cap → trade is clamped at the cap. If you raise this above 5%, the bot's status card shows a red⚠ HIGH RISK — cap N%badge as a deliberate reminder. - Max Drawdown (%) (default
15.0) / Max Daily Loss (%) (default5.0) — drawdown halts until you restart the bot; daily loss halts until the next trading day (Ecuador timezone). Daily Loss must be strictly less than Max Drawdown. - TP1/TP2/TP3 R-multiples (default
1 / 2 / 3) and TP1/TP2/TP3 percentages (default100 / 0 / 0, must sum to 100) — used when TP Source = Bot. - Max Positive Trades/Day (default
2), Max Negative Trades/Day (default1), Max Active Trades (default1) — daily/concurrent caps. - Bot Log Folder — change the default path to one that exists on your machine (the shipping default is a developer path).
Max Risk Cap — read this: raise the cap deliberately if you want the AI's higher
position_size_pctrecommendations through; otherwise leave at 5%. App risk over the cap is rejected at trade time (the trade simply doesn't open and the rejection is logged) — not silently clamped. The Cap also blocks bot startup if your Fixed Risk input is configured above the Cap.
Step 4: Confirm the bridge route is configured
Open the bridge dashboard, go to the Routes view, and confirm that the destination for the port you just attached is Enabled and has the correct Routing Key. The bundled defaults are already wired up, but verifying matters because a missing or wrong routing key silently drops the signal.
MetaTrader 5 EA Installation
The MT5 Expert Advisor is bundled with the desktop bridge and installs in one click. The EA is two files that work together:
SkyAnalystAutomatedTraderLite.ex5— the brain. Polls the listener once per second, validates the JSON payload, runs every safety check (instrument match, duplicate trade ID, risk cap, SL/TP sanity), sizes the position from your risk settings, and places the order through your broker.MT5SkyBridgeConnector.dll— the ears. Listens on the local port (e.g.127.0.0.1:8000) and hands incoming webhooks to the EA. It doesn't think, doesn't trade.
Together they form a one-way pipe: SkyAnalyst's cloud sends a signal -> the DLL receives it locally -> the EA validates and executes it in MT5.
Prerequisites
- MetaTrader 5 installed and signed in to your broker account. Pepperstone is the reference broker used in the bundled defaults; IC Markets, FP Markets, OANDA, and FTMO MT5 also work.
- An account with sufficient balance and the right leverage for the lot sizes you plan to trade. The EA computes lot size from your risk settings (Fixed Risk or the webhook's
position_size_pct), not from a fixed lot.
One-time MT5 platform setup
Do this once per MT5 install — every future EA attachment inherits these settings.
- In MT5, open Tools -> Options -> Expert Advisors.
- Check both Allow algorithmic trading AND Allow DLL imports.
- Click OK.
- Make sure the Algo Trading button in the top toolbar is green (click it if it is red).
Step 1: Install the EA files
You can install in two ways. The one-click install from the bridge dashboard does both file copies for you and is the recommended path.
Option A — One click from the bridge dashboard (recommended):
- In the bridge dashboard, click Install in MT5.
- The bridge scans for installed MT5 terminals and lists each one with its short data-folder ID (e.g. Pepperstone MetaTrader 5 — 73B7A242). If your terminal isn't auto-detected, click Browse... and select the MT5 data folder manually.
- Pick the terminal you want and click Install.
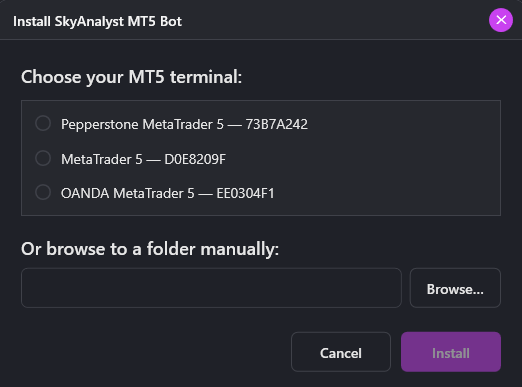
Install dialog: pick the MT5 terminal you want — each row is a separate MT5 install detected on your machine
Option B — Manual install:
- In MT5, click File -> Open Data Folder.
- Drop
SkyAnalystAutomatedTraderLite.ex5intoMQL5\Experts\SkyAnalyst\(create the SkyAnalyst subfolder if needed). - Drop
MT5SkyBridgeConnector.dllintoMQL5\Libraries\. - Back in MT5, click on the Navigator panel and press F5 to refresh.
Either way, you should now see SkyAnalystAutomatedTraderLite under Navigator -> Expert Advisors -> SkyAnalyst, ready to drag onto any chart.
Step 2: Attach the EA to a chart per instrument
Each running EA instance listens on its own local port and handles one instrument. The bridge ships with bundled default ports for MT5 (8000-block):
| Port | Instrument (MT5) | Routing Key |
|---|---|---|
| 8000 | US30 (Pepperstone) | US30-Pepperstone |
| 8001 | NAS100 (Pepperstone) | NAS100-Pepperstone |
| 8002 | US500 (Pepperstone) | US500-Pepperstone |
| 8003 | XAUUSD (Pepperstone) | XAUUSD-Pepperstone |
| 8004 | EURUSD (Pepperstone) | EURUSD-Pepperstone |
| 8005 | USDJPY (Pepperstone) | USDJPY-Pepperstone |
| 8006 | BTCUSD (Pepperstone) | BTCUSD-Pepperstone |
| 8007 | AUDUSD (Pepperstone) | AUDUSD-Pepperstone |
| 8008 | USDCAD (Pepperstone) | USDCAD-Pepperstone |
| 8009 | GBPUSD (Pepperstone) | GBPUSD-Pepperstone |
| 8010 | US30_CASH_FTMO | US30_CASH_FTMO |
| 8011 | US500_CASH_FTMO | US500_CASH_FTMO |
| 8012 | US100_CASH_FTMO | US100_CASH_FTMO |
MT5 vs cTrader ports: MT5 uses 8000-8012, cTrader uses 8050-8062. If you run both side-by-side on the same machine, the ports never collide — but the bridge routes by Routing Key, not by port, so each destination still needs its key configured correctly.
For each instrument you want to automate:
- Open the MT5 chart for that exact broker symbol (e.g.
US30.cashfor the Pepperstone Dow Jones,EURUSDfor the euro). - From the Navigator panel, expand Expert Advisors -> SkyAnalyst and drag SkyAnalystAutomatedTraderLite onto the chart.
- In the attach dialog that opens, on the Common tab, check Allow Algo Trading.

Common tab: tick Allow Algo Trading for this EA instance
- Switch to the Dependencies tab and confirm Allow DLL imports is checked. You will see
MT5SkyBridgeConnector.dlland a handful of Windows runtime DLLs listed — that is expected.
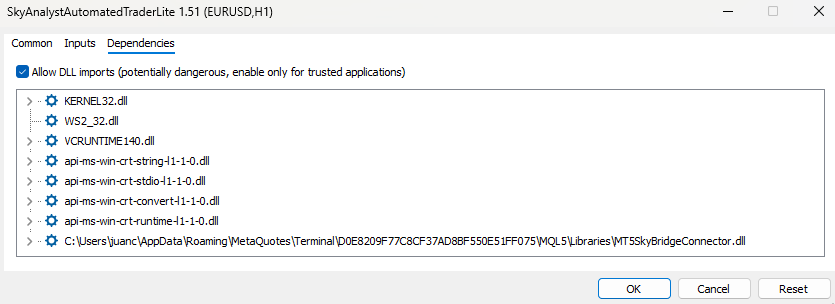
Dependencies tab: tick Allow DLL imports and confirm MT5SkyBridgeConnector.dll is listed
- Switch to the Inputs tab and configure the key parameters (see Step 3 below).
- Click OK.
The EA's status panel appears in the top-left of the chart and should show Port Status: OK in lime within a second or two. That confirms the DLL is listening.
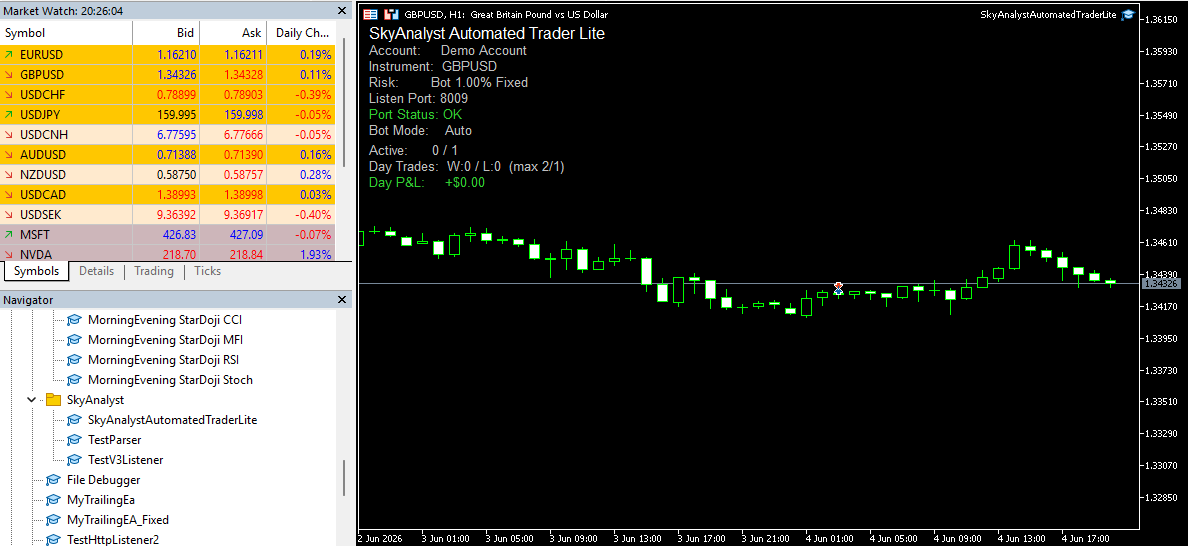
EA running on a GBPUSD chart: Port Status: OK = the DLL is listening on the assigned port
Repeat for each instrument you want to automate. You can run as many EA instances in parallel as you have charts open.
Step 3: EA Inputs — what each setting does
The EA's Inputs tab is grouped into sections that mirror the on-chart panel. Defaults are conservative; the only field you must change is the instrument selector.
=== ONE-TIME SETUP — do once, then forget === (read-only reminders for the platform settings above — Allow DLL imports, Allow Algo Trading, toolbar Algo Trading button green)
=== SkyAnalyst Automated Trader Lite ===
- BotMode (default
Auto) —Autolistens for webhooks.Manual_Onlydisables the listener entirely (useful for paper-testing the panel without accepting signals). - AccountName (default
Demo Account) — used in log filenames and the duplicate-trade-ID cache key. Pick a label that distinguishes your accounts (e.g.Pepperstone Live).
=== Trading Bridge Settings ===
- SymbolFilter (required — defaults to
Choose_Your_Instrumentwhich keeps the EA disabled) — pick the instrument this EA instance handles. This auto-configures the listening port from the table above. - SLTPOffsetPips (default
0.0, range +/-50) — uniform shift applied to the AI's SL and every TP. Leave at 0 unless you have a specific reason to widen. - RiskSource (default
RiskTP_Bot) —RiskTP_Botuses your Fixed Risk below.RiskTP_Appuses the AI's recommendedposition_size_pctfrom the webhook. - TpSource (default
RiskTP_Bot) — same idea for how take-profit percentages get allocated.
=== Fixed Risk Settings ===
- FixedRiskUnit (default
Percent) — choose between percent-of-balance or dollar amount. - FixedRiskPercent (default
1.0) — risk per trade when Risk Source = Bot. Must be > 0 and ≤ Max Risk Cap. - FixedRiskDollar (default
100.0) — risk per trade in dollars when Risk Unit = Dollar. - MaxRiskCap (default
Cap_5pct, choices: 5/10/15/20/25/30%) — the hard ceiling that caps BOTH your bot's Fixed Risk AND anyposition_size_pctarriving from SkyAnalyst's cloud. See the dedicated section below.
=== Risk Limits ===
- MaxDrawdown (default
15.0%, range 0-50) — equity drawdown that halts the bot until you restart MT5. The restart is intentional: it forces you to look at your account before trading resumes. - MaxDailyLoss (default
5.0%, range 0-30) — daily-loss limit that halts trades for the rest of the trading day (Ecuador timezone). Resumes automatically the next day. Must be strictly less than MaxDrawdown.
=== Trade Parameters ===
- TP1Percent / TP2Percent / TP3Percent (default
100 / 0 / 0) — partial-close allocation. Must sum to 100. TP1 must be > 0. - TP1R / TP2R / TP3R (default
1.0 / 2.0 / 3.0) — R-multiples used when TP Source = Bot.
=== Daily Limits ===
- MaxPositiveTradesDay (default
2) — once you've hit N winners, no more trades today. - MaxNegativeTradesDay (default
1) — same idea on the loss side. - MaxActiveTrades (default
1) — how many trades can be open simultaneously on this symbol.
=== Logging ===
- LogFolder (default
SkyAnalyst Logs) — subfolder underMQL5\Files\. Absolute Windows paths are silently re-mapped to the safe default.
=== Custom Port Overrides (0 = use default) ===
- One integer input per instrument, all defaulting to
0(= use the default port from the table above). Only set one of these if the default port is already in use on your machine.
Max Risk Cap — the hard ceiling that catches both sides
This is the most important parameter to understand. MaxRiskCap caps BOTH bot-source risk AND webhook-source risk. The behavior depends on which side hit the cap:
- Webhook (App-sourced) risk over cap -> REJECT. If the AI sends a
position_size_pctof 8% but your cap is 5%, the EA refuses the trade and logs[WEBHOOK] REJECT - webhook risk $X exceeds Max Risk Cap $Y. Lower the AI's risk in SkyAnalyst, or raise the dropdown. - Bot (Fixed) risk over cap -> CLAMP. Only happens if your account balance shrinks mid-session enough that your Fixed Dollar value now exceeds 5% of balance. The trade still opens, just at the capped amount. Logged as
[RISK-CAP] Bot risk $X clamped to $Y.
Default is 5%. If you raise the cap, the EA's status panel shows a red banner: >> HIGH RISK MODE - N% cap selected <<. That banner is a deliberate reminder that you are above the conservative default.
Practical guidance: leave Max Risk Cap at 5% unless you have a specific reason to accept higher risk on a specific instrument. Raising it does not make the AI more aggressive — it only widens the ceiling at which the bot will accept the AI's risk recommendations. If you want the AI's full risk through, set Risk Source =
RiskTP_AppAND raise the cap to match the highestposition_size_pctyou are willing to accept.
Step 4: Confirm the status panel is healthy
A correctly-running EA shows this panel in the top-left of the chart:
| Field | Healthy value |
|---|---|
| Account | Your AccountName input |
| Instrument | The selected symbol (e.g. GBPUSD) |
| Risk | E.g. Bot 1.00% Fixed or App / Cap 5% |
| Listen Port | The auto-assigned port (e.g. 8009 for GBPUSD) |
| Port Status | OK in lime — the DLL is listening |
| Bot Mode | Auto |
| Active | 0 / 1 (open trades / MaxActiveTrades) |
| Day Trades | W:0 / L:0 (max 2/1) |
| Day P&L | +$0.00 or -$X.XX (lime / tomato) |
If you see Port Status: ERROR (retrying) (orange) or FAILED - restart EA (red), another process is using that port. Either close the conflicting process, or set a Custom Port Override in the EA inputs and update the matching destination in the bridge Routes view.
If you see BOT DISABLED with a Fix: <reason> line, the EA failed pre-flight validation. The most common reason is No instrument selected — open the EA inputs and pick a SymbolFilter.
Step 5: Confirm the bridge route is configured
Open the bridge dashboard -> Routes view -> confirm the MT5 destination for this instrument is Enabled and its Routing Key matches the column in the table above. Bundled defaults come pre-wired but verifying matters: a missing or wrong routing key silently drops the signal.
Routing: How Signals Find the Right Bot
The bridge supports running many bots on one machine, one per instrument. Routing makes sure each signal reaches exactly one bot.
Routing Key Format
Every destination in the bridge has a Routing Key in the form:
<SYMBOL>-<BROKER>
Examples: US30-Pepperstone, NAS100-Pepperstone, XAUUSD-Pepperstone. The _CASH_FTMO instruments are an exception — the broker hint is already inside the symbol, so the routing key stays as US30_CASH_FTMO.
Why the broker suffix matters
The same symbol can mean different contracts at different brokers. US30 on Pepperstone is a CFD on the Dow Jones; US30 on a different broker may price differently, have a different tick size, or behave differently on news. By appending the broker name, the bridge can have multiple US30 destinations on the same machine — one per broker — without ambiguity.
Fail-closed behavior
The bridge will refuse to forward a signal if:
- The destination has no Routing Key, OR
- The Routing Key is empty or set to a wildcard, OR
- The signal's instrument does not exactly match any enabled destination's Routing Key (case-insensitive)
This is deliberate. A wildcard or missing key would mean "send this signal everywhere," and that is exactly how an automated US30 trade ends up entering on a XAUUSD chart. No routing key, no execution. You will see the dropped signal logged in the bridge dashboard so you can fix the configuration and re-trigger.
Worked example: US30 alert -> cTrader fill
- SkyAnalyst Analysis Agent posts a US30 setup with grade 8.4 (Grade-A Fast Track-eligible).
- Price enters the entry zone. The Entry Evaluator validates and flips the trade to
triggered. - Alert-dispatcher sends a webhook to your relay device URL with
Data.instrument = "US30-Pepperstone"and the full trade details. - Your bridge receives the webhook over SignalR, extracts the instrument, and finds the destination with Routing Key
US30-Pepperstone(port 8050). - The bridge POSTs the payload to
http://localhost:8050, where the cTrader bot is listening. - The cTrader bot reads
position_size_pct, computes the lot size from your account balance, places a market or pending order with the bot's stop-loss and take-profit configuration, and reports success.
The whole loop typically completes in well under a second.
Bot Behavior: Lot Sizing, SL/TP, Order Placement
The bot inside cTrader (or MT5, when shipped) reads each incoming payload and decides exactly how to place the order. The bridge does not interpret the payload — it just hands it over.
How the bot computes lot size
The payload includes position_size_pct, the AI's recommended risk percentage (e.g., 0.5 means risk 0.5% of equity on this trade). The bot:
- Reads your current account balance from cTrader.
- Multiplies by
position_size_pctto get the dollar risk for this trade. - Measures the distance from entry to the chosen stop-loss in pips/points.
- Computes the lot size that makes (risk per pip) × (distance) equal the dollar risk.
- Rounds to the broker's minimum lot increment, applies your configured per-trade lot cap, and submits the order.
If position_size_pct is missing or the bot has been configured with a fixed override lot, the bot falls back to that fixed lot.
Stop loss and take-profit placement
The payload contains:
entry_min/entry_max: the entry zone boundariessl_tight/sl_wide: two stop-loss options the AI considered acceptabletp1/tp2/tp3: take-profit ladder
The bot uses the SL/TP variant you configured in its inputs (default: sl_wide for safety, tp1 as the primary target, with the broker's partial-close feature handling tp2 and tp3). All distances are converted to broker pips/points by the bot using the instrument's contract spec.
Testing the loop end-to-end
Before going live:
- In SkyAnalyst, enable Demo Trading on your account (or use a separate demo subscription).
- Pair the bridge with the demo profile and attach the cTrader bot to a demo account chart in cTrader.
- Manually trigger a low-grade signal from the AI (or wait for one) and watch:
- The signal arrives in the bridge's webhook log.
- The bridge forwards to
http://localhost:<port>. - The bot logs
Order placedand you see a position open in cTrader.
- Let the trade run to either TP1 or SL and confirm the bot closes/manages it as you expect.
- Only then switch the bridge profile to your live account and live cTrader bot.

Enabling Automated Trading
Per-Trade Automation
Once your Trading Bridge is connected and a bot is running:
- Navigate to your Monitored Trades in the AI Trading Agents hub
- Find the trade you want to automate
- Click the "Automate" button on the trade card
- In the connection modal, click "ENABLE AUTOMATED TRADING"
- The button changes color to indicate automation is active (orange = active, purple = inactive)
When enabled, the following happens automatically:
- The AI monitors the trade as usual (entry zone alerts, condition evaluation)
- When entry conditions are met, instead of only alerting you, the signal is also sent to your Trading Bridge
- The bridge forwards the complete trade details to the bot matching the trade's instrument
- The bot places the order in your trading platform
The connection modal with auto-trade active — the orange button confirms signals will be forwarded
Wizard-level Automation (AutomatedTradingCard)
Inside the Generate Trade Ideas wizard (Step 6) you can flip auto-execute on for every trade an agent produces, without having to enable per-trade. This lives in the AutomatedTradingCard in the AI Trading Agents wizard.
- The card is disabled until you have paired a bridge device.
- Once paired, the toggle becomes available. An AutomatedTradingConfirmDialog asks you to confirm the risk before enabling.
- The toggle's state is per-agent: a Smart Scan US30 agent with auto-execute on will forward every triggered setup; a different agent on the same account can remain manual.
For the full wizard walkthrough, see the AI Trading Agents chapter of this guide -> The Wizards -> Step 6: Automated Trading.
Grade-A Fast Track
The GradeAFastTrackCard (same wizard step) opts your agent into a faster execution path for Grade-A setups (confidence ≥ 8 (eight or above)):
- Step-1 conditions (the bullet list of evidence the AI required) are skipped.
- The zone gate still applies: price must enter the AI's entry zone before the signal fires.
- The AI Entry Evaluator still runs as a safety veto — it can reject a Grade-A setup if the live read disagrees, and the four hard gates (open-position guard, news-blocking window, recent-loss gate, same-direction loss gate) can still block the alert.
Use Grade-A Fast Track when you want speed on the AI's highest-confidence ideas; leave it off when you want the full conditions check on every trade. See the AI Trading Agents chapter for the full rationale and risk discussion.
What the Signal Contains
Each automated signal includes:
- Instrument: the routing key (e.g.,
US30-Pepperstone) - Direction: LONG or SHORT
- Entry zone: minimum, maximum, aggressive, and conservative levels
- Stop loss: tight and wide options
- Take profit levels: TP1, TP2, TP3 with ranges
- AI confidence score and grade
position_size_pct: the AI's recommended risk percentage- AI decision notes (machine-readable rationale)
The bot uses this information to place orders according to its configuration.
Fill confirmation gap (important): SkyAnalyst marks a trade as "entered" based on its own price feed crossing the entry zone, not on a confirmation from your broker. The bot's actual fill may differ slightly (or fail entirely if the broker rejects the order). Always cross-check the position in cTrader, especially during news or thin liquidity, and treat the SkyAnalyst "entered" badge as a signal-side state, not a broker-side state.
Monitoring & Troubleshooting
Connection Status
The bridge sends an application-level heartbeat every 20 seconds (v1.46+; earlier versions used 30 s). The web app interprets this as follows:
- Green WiFi icon: bridge is connected and the last heartbeat arrived inside the expected window
- Amber WifiOff icon: the bridge was recently connected but has missed one or more heartbeats — typically this means SignalR is reconnecting after an idle disconnect, or the bridge process is paused (laptop sleep, app minimized to tray, network hiccup). The web app still shows your device as "Last seen X ago." If you see amber for more than ~30 s, check that the bridge tray icon shows "Connected."
- Disconnected: bridge app is not running or has lost connectivity for longer than the timeout.
The 20-second cadence (down from 30 s) is tighter than every documented edge-proxy idle timeout, so transient amber states on a stable wired connection are usually a sign of a real network blip, not a heartbeat-tuning issue.

The three bridge connection states — green, amber, and disconnected — as they appear in Settings
Latency Interpretation
When you click Test Connection, the relay returns a round-trip latency in milliseconds.
| Reading | Color | Meaning |
|---|---|---|
| < 200 ms | Green | Healthy. Order-routing latency is well below human reaction time. |
| 200-500 ms | Amber | Tolerable, but investigate. Check that the bridge is on wired ethernet and that no VPN is in the path. |
| > 500 ms | Red | Investigate immediately. Auto-trading at this latency can mean a meaningful slippage gap between AI signal and broker fill. |
Device Management
- View all paired devices in Settings -> Trading Bridge
- See the last seen timestamp and latency for each device
- Disconnect a device if you no longer need it
- Maximum 3 active devices per account
Common Issues
| Issue | Likely cause | Solution |
|---|---|---|
| Pairing code expired | Code older than 10 min | Generate a new code |
| "Maximum devices reached" | Already paired with 3 devices | Disconnect an unused device in Settings first |
| Bridge shows connected but no signals | Auto-trade off on the specific trade or agent | Enable auto-trade on the trade card or in the wizard's AutomatedTradingCard |
| Signals sent but no orders placed | Bot not attached to chart, bot not Running, wrong port | Verify the bot is Running on the matching chart and the listening port matches the bridge's Routing Key port |
| Signals dropped with "no matching destination" | Routing key mismatch (case is fine; the symbol or broker suffix differs) | Confirm Routing Key is <SYMBOL>-<BROKER> exactly matching what the relay sends |
| "Connected" but amber WifiOff | One or more heartbeats missed | Wait 30 s; check tray icon; if persistent, check Wi-Fi / Ethernet stability |
| High latency warnings | Wi-Fi, VPN, or saturated link | Move to wired ethernet, disable VPN, close large uploads |
| Bot logs "Order rejected" | Broker rules (margin, leverage, news block, market closed) | Check cTrader's / MT5's journal for the broker error message and adjust risk or timing |
MT5 panel shows Port Status: ERROR or FAILED - restart EA | Another app on your machine is using the listening port | Close the conflicting app, OR set a Custom Port Override in EA Inputs and update the matching destination in the bridge Routes view |
MT5 panel shows BOT DISABLED - Fix: No instrument selected | You haven't picked a SymbolFilter in EA Inputs | Right-click the chart -> Expert Advisors -> Properties -> Inputs tab -> pick your instrument from the dropdown |
MT5 panel shows HIGH RISK MODE banner in red | Max Risk Cap is set above 5% | Deliberate reminder. Lower the Max Risk Cap dropdown back to 5% if this wasn't intentional |
MT5 webhook log shows [WEBHOOK] REJECT - webhook risk exceeds Max Risk Cap | The AI sent a position_size_pct higher than your Cap | Either lower the AI's risk in SkyAnalyst, or raise the EA's Max Risk Cap dropdown |
Webhook Security
When you (or an agent) configure webhook delivery from SkyAnalyst — either to your bridge device URL or to an external endpoint — there are a few canonical safeguards to know:
- Per-device webhook URLs: every paired bridge has a unique URL of the form
https://skyanalyst-relay-production.up.railway.app/<deviceId>/webhook. The device ID is a UUID — treat it as a secret. Anyone with the URL can push payloads at your bridge. - Relay-side validation: the relay only forwards if the payload has the required envelope fields (
EventId,Timestamp,Type,UserId,AccountId,Data). Connection tests use a separatetype: "connection_test"payload that is forwarded without ACK tracking. - Bridge-side fail-closed routing: as covered above, no routing key means no forward.
- Custom security headers: for external webhooks (alerting your own backend, Telegram bots, custom dashboards), you can configure custom security headers in Settings -> Webhook Security. The SkyAnalyst dispatcher will add those headers to every outbound webhook so your endpoint can verify the request is genuinely from SkyAnalyst.
For the per-alert webhook security note that appears inline in the wizards (Monitoring Alerts, Trade Setup Alerts, Analysis Notifications), the canonical link is the same: Settings -> Webhook Security.
Operational rule: rotate the device pairing (disconnect + re-pair) if you ever leak the device URL. Codes are cheap; a compromised bridge URL means a third party could send arbitrary payloads to your bot.
Safety & Limits
| Safety Feature | Details |
|---|---|
| Pairing code expiry | Codes valid for 10 minutes only |
| One-time use codes | Each code can only be used once |
| Rate limiting | Maximum 5 pairing codes per hour |
| Device limit | Maximum 3 active devices per account |
| Per-trade toggle | Automation must be enabled per trade or per agent (wizard) |
| Authentication | Relay secret required for bridge-to-server pairing validation |
| Fail-closed routing | Missing or wildcard Routing Key drops the signal rather than broadcasting it |
| Heartbeat 20 s | Tighter than any documented edge-proxy idle timeout |
Critical Safety Rule: Always test automated execution on a demo account first. Start with the smallest possible position size. Monitor the first several automated trades closely before trusting the system to operate unattended. You remain responsible for all trades executed through the Trading Bridge.