Settings & Credits
Everything you need to configure your account and understand how billing works: alerts, integrations, profile, subscription, and the SkyAnalyst credits model.
Settings & Preferences
The Settings page is mission control for your SkyAnalyst account: identity, alert behaviour, integrations (Trading Bridge, Telegram, webhooks), subscription, credits, and recent-chat hygiene. Every card on the page is documented below so you can find the right knob without hunting.
Where things live: a single
/settingsroute hosts every card. On desktop it is a long, scrollable page; on mobile it is the same content stacked inside tabs. Anchors like/settings#alertsscroll directly to a specific card.
Reaching Settings
There are two equivalent ways into the Settings page:
- Sidebar (desktop): click the gear icon labelled Settings at the bottom of the left navigation rail. This route is
/settings. - Mobile burger menu: open the top-left menu and tap Settings. The same page renders, with cards grouped under collapsible tabs.
If you arrive at Settings because the app redirected you (for example, after running out of credits), a banner explains why and links straight to the relevant card. The most common one is the out-of-credits banner with Upgrade and Top-up buttons inline.
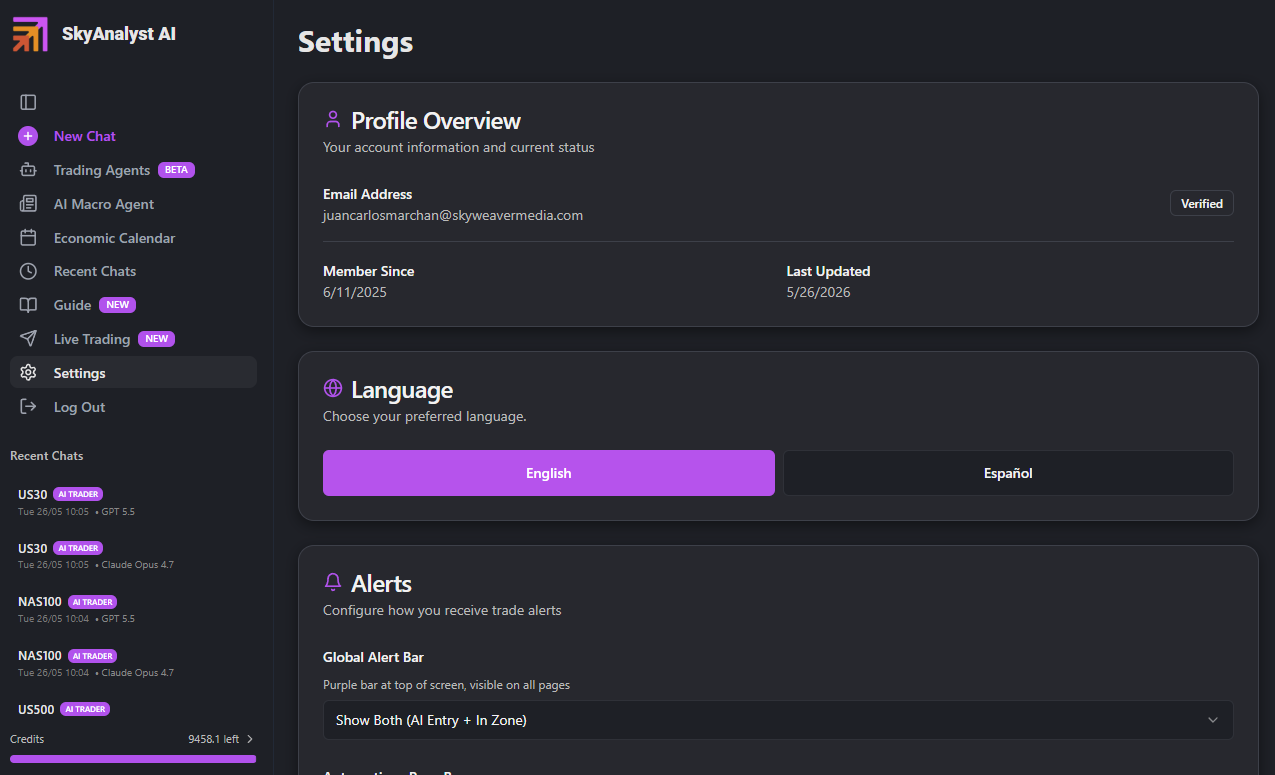
Profile
The Profile card is the first thing on the Settings page. It holds the basics of your account identity.
Name & display name
- Display name is what shows up in the app header, the welcome screen, and in masters' chat handles.
- You can edit it inline and save with the Save button. Changes take effect immediately on next page load.
- Your email is the one tied to authentication (email/password, Google OAuth, or Microsoft OAuth — whichever you used to sign up).
- Email is read-only on this card. To change the email on your account, contact support@skyanalyst.ai.
Password
- For email/password accounts, use the Change Password link to receive a password-reset email. You will be signed out of other sessions.
- Google / Microsoft OAuth accounts do not have a SkyAnalyst password — manage credentials through Google or Microsoft directly.
Language
The Language card (globe icon) toggles the entire UI between English and Spanish (Español).
- The setting is persisted to your user profile so it follows you across devices.
- The change is applied immediately; you do not need to reload.
- AI replies in chat also honour the language preference where possible — when you ask a question in Spanish, you get Spanish back.
Theme
The product currently ships with a dark theme optimised for long trading sessions.
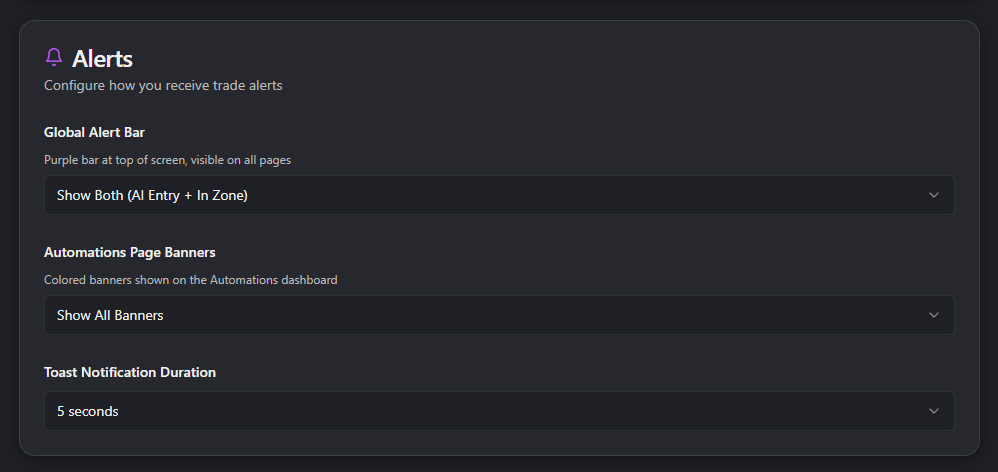
Alerts (Alerts Settings Card)
The Alerts card (bell icon) governs how the app gets your attention when a setup approaches its entry zone or when the AI Entry Evaluator approves a trade. It has three independent controls.
Global Alert Bar mode
The Global Alert Bar is the purple bar that appears at the very top of the screen on every page when something important happens. It is the cross-app surface for alerts — it follows you out of the AI Trading Agents hub into chat, Market Brief, or anywhere else.
The selector offers four modes:
| Mode | What it shows |
|---|---|
| Show Both (AI Entry + In Zone) | Both AI-approved entries and "price reached the zone" notifications. This is the default and the most informative setting. |
| AI Entries Only | Only the AI Entry Evaluator's approvals. Quieter — you only see signals the AI has already validated. |
| In Zone Only | Only the "price has reached the entry zone" notifications. Useful if you trust your own discretion at the zone and treat AI approval as optional. |
| Disabled | The bar never appears. Recommended only if you live in the AI Trading Agents hub and use its inline banners instead. |
When to switch: if you find the bar too noisy during a quiet session, drop to AI Entries Only. If you prefer to act on every in-zone moment regardless of AI veto, use In Zone Only.
Automations Page Banners mode
The Automations page has its own colour-coded banners directly above the trade grid (emerald = AI Entry Confirmed, yellow = In Zone awaiting AI, amber = In Zone with AI off). This selector controls which of those banners are rendered.
The four modes mirror the Global Alert Bar:
| Mode | What it shows |
|---|---|
| Show All Banners | Every banner is rendered (default). |
| AI Entry Banner Only | Only the emerald "AI Entry Confirmed" banner. |
| In Zone Banners Only | Only the yellow / amber "In Zone" banners. |
| Disabled | No banners; the grid renders directly under the filter bar. |
Why two separate controls: the Global Alert Bar follows you across the whole app; the Automations banners live only in the AI Trading Agents hub. You may want them on different policies (for example, banners enabled on the page where you act, bar disabled to keep the rest of the app quiet).
Toast Notification Duration
Toasts are the small pop-up cards that slide in from the corner — used for confirmations, errors, and high-urgency alerts. The selector chooses how long each toast stays on screen:
- 5 seconds (default) — fast, unobtrusive, suitable for active screen time.
- 10 seconds — gives you time to read a long message if you're glancing back and forth between charts and the app.
- 30 seconds — for alerts you want to be sure you see. Use this if you tend to step away from the desk.
The setting takes effect immediately for every new toast and is persisted across sessions and devices.
Sound preferences
Per-alert sound selection lives inside each automation's wizard (Step 4: Alert Setup), not on this card. From there you choose the sound clip for Entry Zone alerts and AI Entry Signal alerts, plus the sound duration.
To preview or change sounds in context, open the relevant automation's settings from the Configure tab in the AI Trading Agents hub. See the AI Trading Agents chapter of this guide → Step 4: Alert Setup for the full sound library tour (the wizard chapter covers it alongside snooze, channel selection, and lifetime).
Trading Bridge
The SkyAnalyst Trading Bridge card (radio icon, BETA badge) is the gateway for automated execution. From here you:
- Download the Windows desktop app (button in the card header).
- Generate a pairing code (the code appears as
XXXX-YYYYwith a 10-minute countdown). - Enter the code in the desktop app to link your browser session to your local trading platform.
- See Connected status with device name, last-seen timestamp, and latency once paired.
- Run Test Connection to send a no-op signal and read the round-trip latency.
- Disconnect a device when you no longer need it.
Up to 3 devices can be paired per account at a time.
Where to learn more: every detail of the Bridge — installation, bot setup for cTrader / MT5, routing keys, heartbeat behaviour, latency thresholds, safety rules — lives in the dedicated chapter. See the Trading Bridge chapter of this guide for the full walkthrough.
Webhooks (Webhook Security)
The Webhook Security card lets you attach a custom HTTP header to every outgoing alert webhook. If you've wired SkyAnalyst into Discord, Slack, a private receiver, or a trading-stack microservice, this is how you verify the request actually came from your SkyAnalyst account and not a stranger.
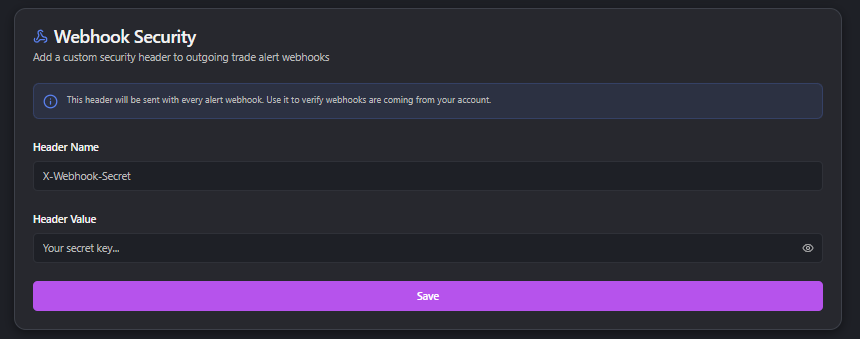
Setting it up
- Pick a Header Name. Common conventions:
X-Webhook-Secret,X-Sky-Token,Authorization. Allowed characters: letters, numbers, hyphens, and underscores. - Paste your Header Value — a long random string that only you know. Treat it like a password. Use the eye icon to toggle reveal/hide while you type.
- Click Save. The card immediately shows a server-side verification snippet, like:
if (req.headers['x-webhook-secret'] !== 'your-value-here') {
  return res.status(401).send('Unauthorized');
}
- Add the matching check on your receiver. From this point on, every alert webhook SkyAnalyst sends on your behalf includes that header.
Where webhook URLs are configured
The header set on this card is global — it applies to every webhook. The actual webhook URLs are set per automation in the wizard (Step 4 for trade-idea agents, Step 4 for analysis agents). You can mix and match: different URLs per agent, single shared secret.
Clearing the header
The Clear button removes both the name and value. Outgoing webhooks then carry only the default Content-Type headers — useful when rotating secrets (clear, paste new value, save).
Security tips
- Rotate periodically. Treat the secret like an API key.
- Use HTTPS only for your receiver URL. SkyAnalyst will send to plain HTTP, but the secret would travel in clear text.
- Don't commit the secret to version control.
- One secret across all agents is fine — the secret proves the request is yours; the payload tells you which agent sent it.
Telegram
The Telegram card in Settings groups two independent things into one place:
- Community Channel — a Telegram channel where SkyAnalyst shares trade setups and market commentary. Joining is optional, social, and stays with you even if your subscription ever lapses.
- Alerts (DMs) — personal direct messages from the bot when your monitored trades hit their entry zones or get AI approval.
These are two different features sharing the same bot (@SkyAnalystAiBot) and the same Settings card, but they have separate setup flows because Telegram treats "channel membership" and "DM permission" as distinct things.
Community Channel
Click Generate Invite Link. A 24-hour invite link and QR code appear. Open the link on your phone (or scan the QR with your camera) — Telegram opens the channel and asks you to join. Once you've joined, you'll see new setups shared there.
No persistent "Connected" state is shown — joining the channel doesn't bind anything to your SkyAnalyst account. If you tap Generate again later, you'll just get a fresh invite link; if you're already in the channel, Telegram will just open it.
Alerts (DMs)
This is what you need if you want personal trade alerts sent to your Telegram. Two entry points lead to the same pairing flow:
- From Settings → Telegram card → Alerts (DMs) — click Connect Telegram.
- From any alert configuration where you check the Telegram box — per-trade alert settings, master automations, custom automations, scheduled analyses. If you're not yet paired, the same modal opens automatically.
The pairing modal shows a deep link plus a QR code. Tap the link on your phone (or scan the QR), then tap Start in the bot chat. Within a couple of seconds the modal flips to ✅ You're connected and closes. The Alerts (DMs) section now shows a green Connected pill, and the Telegram checkbox you originally clicked is flipped on automatically.
After pairing, any alert config with Telegram enabled will DM you — Entry Zone alerts, AI Entry Signal alerts, automation notifications, etc.
Switching accounts
If you want alerts on a different Telegram account, click Switch account from the Telegram card. A fresh pairing link is generated; tap Start from the new account. The previous binding is replaced.
Disconnecting
Click Disconnect from the Telegram card. A confirmation appears, then your alerts pause until you reconnect. Block/delete actions inside Telegram itself do not propagate to SkyAnalyst — alerts will silently fail to deliver until you disconnect from Settings or re-pair from a working Telegram account.
Operational notes
- One Telegram per account. You can receive personal alerts on only one Telegram account at a time. Switch account overwrites the previous binding.
- No group chats. Alerts go to your 1-to-1 conversation with the bot. Forward in Telegram as needed.
- Pairing link expiry. The Alerts pairing link is single-use and valid for 15 minutes — short by design. If it expires, click Generate new link in the modal.
- Community-channel link expiry. The Community invite is valid for 24 hours.
- Empty-state nudge. If you have active monitored trades but haven't paired yet, a dismissible banner on the Automations page invites you to connect. Dismissed banners stay dismissed across sessions.
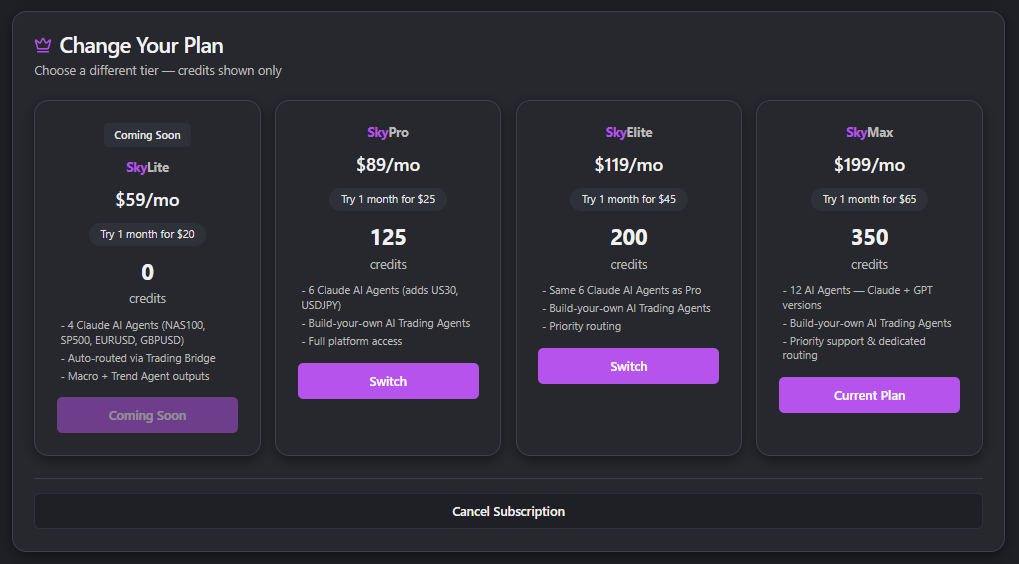
Subscription & Credits
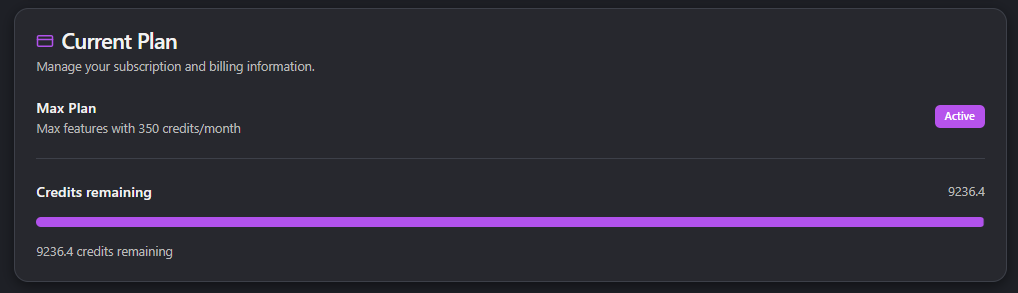
The Current Plan card (credit-card icon) is your billing dashboard. It shows three things at a glance:
- Your current plan — Free, Lite, Pro, Elite, or Max — with a status pill (Active / Trial / Past Due / Cancelled).
- Plan description — credits per month included with the tier.
- Credits remaining — a progress bar with the exact number of credits left in your monthly bucket.
Tier reference
| Tier | Monthly credits | Master AI Trading Agents unlocked |
|---|---|---|
| Free | 0 | 0 |
| Lite | 0 | 2 |
| Pro | 125 | 4 |
| Elite | 200 | 5 |
| Max | 350 | 6 |
Lite users rely on the included Master AI Traders (no monthly credits for custom analysis). New accounts start on a 21-day free SkyPro trial (no credit card) with the SkyPro master count and a 20-credit allowance; when it ends, pick a paid plan to continue.
Changing plans
The Change Your Plan card (crown icon) renders the three paid tiers side-by-side. Click Upgrade / Switch on any tier to be redirected to Stripe checkout in a new tab. Your current tier's button is disabled and labelled Current Plan. The decision tree is:
- Lower tier than current → button reads Switch (handled in the Stripe billing portal, see below).
- Same tier → button reads Current Plan and is disabled.
- Higher tier than current → button reads Upgrade.
Billing portal (Stripe)
If you're on a paid plan, the Manage Subscription button at the bottom of the Change Plan card opens the Stripe customer portal in a new tab. From there you can:
- Update payment method.
- Download past invoices.
- Cancel the subscription (cancellation is end-of-period, not immediate).
- Resume a cancelled plan before period end.
If the portal fails to load, the app falls back to the public Stripe login portal — same destination, just a longer path.
Credits balance
Credits power AI-billable actions: chat queries, scheduled analyses, automation runs, AI Entry evaluations. The Credits remaining progress bar reflects your current monthly bucket. When the bar hits zero, the app shows the out-of-credits banner at the top of every page with two CTAs: Upgrade (to a higher tier) and Top-up (to add credits without changing tiers).
Topping up
The Purchase Additional Credits card (lightning bolt icon) lists the available one-time top-up packs (e.g. 25 credits for $12.50, 50 credits for $25). Click Buy on the pack you want — Stripe checkout opens in a new tab. After payment, the credits land in your bucket within a few seconds (refresh the page if the balance doesn't update right away).
What consumes credits, why Master AI Trading Agents don't, and how the cost projection in each wizard is calculated — all of this is covered in the dedicated mini-chapter. See the Cost & Credits chapter of this guide.
Promo codes
On paid plans, the Promo Code card (tag icon) lets you apply a Stripe coupon to your subscription. Enter the code, press Apply, and the discount (if valid and not expired) is attached to your next invoice. The card surfaces the discount amount and coupon name on success, or an error toast if the code is invalid.
Recent Chats management
Chat history with SkyAnalyst's AI is retained for 7 days. The Recent Chats page (accessible from the sidebar) is where you manage that history.
What you can do
- Search — the search box at the top filters conversations by title or message snippet (case-insensitive). Filtering is client-side, so results update as you type.
- Open — clicking a row opens that conversation in the chat view so you can pick up where you left off.
- Rename — hover a row (desktop) or open the row menu (mobile) and choose Rename. Inline-edit the title and press Enter to save. New title is reflected everywhere the conversation appears (sidebar, search, masters list).
- Delete one — the trash icon (or menu → Delete) removes a single conversation immediately. There is a confirmation dialog before delete.
- Delete all — the Delete All button at the top of the page wipes every conversation in one go. Use with care; this cannot be undone.
What gets deleted vs kept
When you delete a conversation, you delete: the messages, the AI-generated trade ideas embedded in them, and the title. Monitored trades created from that conversation stay alive in the AI Trading Agents hub — they belong to the trade-monitor system, not to the conversation. If you want to remove a monitored trade, do it from its trade card in the AI Trading Agents hub.
7-day retention
Every conversation older than 7 days is automatically purged by a background job. There is no opt-out. If you need to preserve a discussion long-term:
- Copy the relevant text into your own notes before it expires.
- Pin the monitored trades that came out of it (trade cards in the AI Trading Agents hub persist independently).
Why 7 days: it keeps the recent-chats list focused on the active trading week, keeps storage costs predictable, and avoids surprising users with stale ideas appearing on the dashboard months later. If you want a longer retention policy, vote on it in the SkyAnalyst Discord — it's a frequent ask.
Where to go next
- Configure how each agent alerts you -> wizards in the AI Trading Agents chapter of this guide (Step 4: Alert Setup).
- Pair the desktop bridge and route trades to a broker -> the Trading Bridge chapter of this guide.
- Understand what every action costs and how to forecast your monthly bill -> the Cost & Credits chapter of this guide.
- Reach support if anything in Settings is misbehaving — the Contact Support card at the bottom of the page links to support@skyanalyst.ai with a one-click mailto.
Cost & Credits
SkyAnalyst runs on a credits system: every time an AI model thinks for you — answering a chat question, running a scheduled analysis, evaluating an entry — it consumes a small amount of credit. This page explains what consumes credits, how to read the in-app cost projector, and how to predict your monthly spend before you spend it.
1. The credits system
A credit is the unit of AI work in SkyAnalyst. As a ground-truth anchor: on average, 1 credit covers what the AI uses to produce a full analysis. Lighter queries that don't need a full analysis cost much less, proportionally to the tokens actually used.
Because the actual cost of any single action depends on the model selected (Sonnet, Opus, etc.) and the size of the input it processes, credits are best thought of as a soft budget rather than a per-action price list. The projector in the wizard always reflects the live rates for your tier and model selection.
The three things that consume credits are:
- Chat queries in the AI Assistant. When you ask the analyst a question, the request to the model is billed in credits. Large attached charts and long conversation threads use slightly more.
- Scheduled analyses. Every time an Automated Analysis agent fires on its schedule and produces a report, that run consumes credits — once per instrument per run.
- AI Trader runs and AI Monitoring. Every scheduled run of an AI Trader consumes credits per instrument. If you enable AI Monitoring on a setup, the entry evaluator also runs while price is inside the entry zone, consuming a small additional amount per evaluation.
What does not consume your credits:
- Browsing the app. Opening the dashboard, the Trades tab, or the Market Brief page costs nothing — those views read cached data.
- Master AI Trading Agents running on their schedule. Master AI Trading Agents (the ones marked with a Master pill) run on SkyAnalyst's account, not yours. You see their output for free.
- Chat queries on a Master conversation, however, do cost credits — see Section 6 for the nuance.
Specific per-action credit values can change as models change; the projector in the wizard always reflects the current rates.
2. The CostProjectionCard (in wizards)
Every wizard that creates a recurring agent — both Generate Trade Ideas and Automate Analysis — ends with a Cost Projection Card that estimates what the agent will consume each week and each month before you save it.
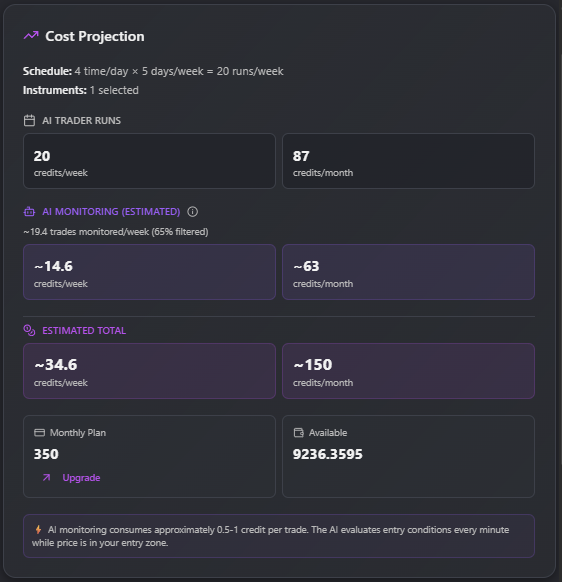
What the card shows
- Schedule & Instruments line — a plain-English readout of your wizard inputs ("2 times/day × 5 days/week = 10 runs/week, 3 instruments selected"). Edit your schedule or instrument list and this line updates immediately.
- AI Trader Runs — the deterministic part of the cost. This is runs/week × instrument count, shown as credits/week and credits/month.
- AI Monitoring (estimated) — appears only if you enabled auto-monitoring in Step 4. The projector adjusts for your confidence threshold, since looser thresholds let more setups through and therefore generate more monitoring activity:
- Threshold 5.0 (Medium+): more setups pass — more trades to monitor.
- Threshold 6.5 (Medium-High+, default): a moderate pass-through rate.
- Threshold 8.0 (High only): fewer setups pass but only the strongest.
- Estimated Total — the headline number, shown as credits/week and credits/month. With AI Monitoring on, this is prefixed with a tilde ("~") to remind you it is an estimate, not a contract.
- Monthly Plan vs Available — your tier's monthly allowance side-by-side with your current balance, with a one-click Upgrade button if the projection looks tight.
- Tip callout — appears automatically when the projection would consume more than half of your monthly plan, suggesting you reduce instruments or frequency.
What drives the cost
You do not need to compute it yourself — the wizard's Cost Projection Card always shows the live number — but the levers that move it are:
- Frequency — how many runs per week (times-per-day × days-per-week).
- Instrument count — every additional instrument multiplies the per-run cost.
- Model selection — the model picked in Step 1 sets the per-call price; bigger models cost more per run.
- Analysis depth — AI Monitoring (the entry-evaluator pass) is an additional layer on top of the run cost when enabled.
- Confidence threshold — looser thresholds (5.0) let more setups through to monitoring; tighter thresholds (8.0) filter out most of them.
Worked example — qualitative
You configure: 3 instruments (NAS100, US500, XAUUSD), 3 times/day (9:30, 10:00, 10:30 EST), 5 days/week, Medium-High+ filter (6.5), AI Monitoring ON. As you move through the wizard, the Cost Projection Card updates live: it shows you the projected weekly and monthly credits for the exact configuration you've picked, in the context of your current tier's monthly allowance.
The pattern to internalize: tightening the filter or trimming instruments lowers the projection; adding instruments or runs raises it. Trust the card over any worked example in this guide — the number on screen is the one that will actually be billed.
Note: exact rates shown live in the wizard depend on your tier and the AI model you select in Step 1. Always trust the numbers in the card over any walkthrough.
3. The CostConfirmation checkbox
Right below the projection, every wizard shows a Confirmation Required card with a checkbox you must tick before the Create button activates.
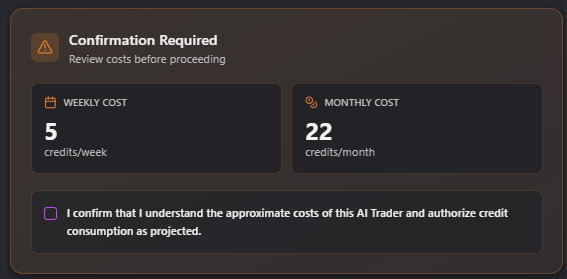
What you are committing to when you tick the box:
- Acknowledgement, not authorization of a hard cap. You are confirming that you have read the weekly and monthly figures and accept that the agent will consume credits at that approximate rate going forward.
- Estimates, not invoices. The numbers shown are the projection at the moment of creation. Actual consumption can be slightly higher (more trades pass the filter than expected) or lower (fewer setups appear, news skips a run).
- Recurring consumption until you pause. Until you pause or delete the agent, it will keep running on its schedule and keep drawing credits. There is no automatic pause when your balance gets low; the system instead notifies you and pauses runs once the balance reaches zero.
If you change the schedule, instruments, or AI Monitoring setting later, the agent will quietly consume more or less — the confirmation was for the configuration you saved.
4. Where to view usage and balance
Open the sidebar and go to Settings → Subscription & Credits. You will see:
- Current Plan card — your tier (Free / Lite / Pro / Elite / Max) and what's included.
- Credits Remaining — your total available balance, combining monthly-allowance credits and any top-up credits you've purchased.
- Allowance progress bar — how much of your monthly allowance you've used so far.
For a full walkthrough of the Settings page see the Settings & Preferences chapter.
The credits read-out at the top of the chat sidebar mirrors this same balance, so you can keep an eye on it without leaving your conversation.
5. How to top up
When you are running low, two paths are available from Settings → Subscription & Credits:
- Purchase Credits — one-off top-up packages that add to your balance immediately and do not expire month-to-month. Top-up credits are consumed after your monthly allowance each cycle, so nothing goes to waste.
- Upgrade Plan — switch to a higher tier (Lite → Pro → Elite → Max) for a larger recurring monthly allowance. The Upgrade button inside the Cost Projection Card jumps you directly to this section.
If you ever hit a hard zero, the app surfaces an "You're out of credits" banner with both a Top-up and an Upgrade button so you can resume immediately.
6. Subscription tiers — what's included
Each tier comes with a monthly credit allowance and a different number of Master AI Trading Agents unlocked:
| Tier | Monthly credits | Master AI Trading Agents unlocked |
|---|---|---|
| Free | 0 | 0 |
| Lite | 0 | 2 |
| Pro | 125 | 4 |
| Elite | 200 | 5 |
| Max | 350 | 6 |
(Master allocation per tier comes from the AI Trading Agents chapter — the 6 Masters are XAUUSD, USDJPY, EURUSD, US500, NAS100, US30.)
Master AI Trading Agents and your credits — the important nuance
This catches new users off-guard, so it is worth being explicit:
- A Master AI Trading Agent running on its schedule consumes no credits from you. SkyAnalyst pays for the run; you see the output for free in your dashboard.
- A chat conversation that originates from a Master AI Trading Agent still uses your credits. When you click "View in Chat" on a Master's setup and ask the AI a follow-up question — "why this entry?", "give me a tighter SL" — that conversation is your chat, billed to your credits the same as any other AI Assistant query.
- Copies of a Master ("Build my own") are 100% yours. Once you copy a Master into a custom agent, every run that custom agent performs is billed to your account on the same rules as any agent you built from scratch.
In other words: Master AI Trading Agents save you credits on the generation side, but the moment you start a dialogue with the AI about a Master's output, the meter starts.
Quick reference: Every wizard cost step links back to this page. If you came from a wizard wondering "what am I committing to?" the answer is in Sections 2 and 3 above.