AI Trading Agents
The AI Trading Agents hub is where SkyAnalyst stops being a chat tool you ask questions and starts being a fleet of always-on agents that scan the market for you, validate every setup at the moment of truth, and — if you want — push the entry straight to your broker through the Trading Bridge. This chapter is the operating manual for that hub: how the hub is laid out, how to read every card, what every wizard step does, and how to keep the fleet healthy day to day.
If you are coming from the previous version of the guide that called this surface Automations, nothing has been taken away — only renamed and re-organized. The hub still has three tabs (Dashboard, Trades, Configure) and the right-rail Performance Panel. What changed is the framing: an "automation" used to mean "a recurring job"; an AI Trading Agent is the same recurring job but with autonomous decision-making layered on top — the agent decides whether a setup is worth taking, whether the entry conditions are clean, whether the trade should be skipped because of news, and (with your permission) whether to fire the order.
The two words mean the same thing in this product. We use AI Trading Agent as the primary noun because it captures what the system actually does; we keep Automation in body copy and the API because it is the noun users have been searching for since v1.
What is an AI Trading Agent
An AI Trading Agent is a configured, persistent piece of intelligence that lives in the AI Trading Agents hub. Once you create one, it runs on the schedule you choose, reads the market with the AI Intelligence Agents (Macro + Trend) as its backdrop, generates trade setups with the Analysis Agent, monitors each setup tick by tick with the AI Entry Evaluator, and notifies you (and optionally your Trading Bridge) the moment a setup is ready to execute.
There are two classes of AI Trading Agent. Picking the right class is the first decision you make in the hub:
| Class | What it produces | Trade monitoring | Output surface |
|---|---|---|---|
| AI Trader | Trade setups (entry zone, stop, take profits, conditions) | Yes — every setup is auto-monitored by the AI Entry Evaluator | Trades tab + Trade Cards + alerts |
| Automated Analysis | Markdown chat report (no setups, no orders) | No — informational only | Chat thread + push notification |
You can have many agents of each class running side by side. A typical Pro fleet looks like four AI Traders (one each for XAUUSD, NAS100, US500, USDJPY) running at 10:00 AM EST plus one Automated Analysis that drops a daily structure brief in your chat at 8:30 AM EST.
Why the rebrand from "Automation" to "AI Trading Agent"
The word "automation" historically meant "this job runs on a timer". That fit the v1 of this feature when all the system did was call the model on a cron, post the answer to the chat, and stop. The v2+ version that ships today does something materially different:
- The agent chooses which setups to monitor based on a quality filter you set.
- The agent re-evaluates every setup at the moment price enters the zone, with a fresh look at price action and short-timeframe candles.
- The agent can veto its own setup if the entry pattern is no longer clean.
- The agent can fire the order via the Trading Bridge with no human in the loop.
That is not mechanical scheduling — that is agentic behavior. So the name follows the behavior.
At-a-glance comparison
| Capability | AI Trader | Automated Analysis |
|---|---|---|
| Generates trade setups | Yes | No |
| Auto-monitors trades | Yes (always on) | No |
| AI Entry Evaluator runs on each setup | Yes | No |
| Can auto-execute via Trading Bridge | Yes (opt-in) | No |
| Sends entry alerts | Yes (zone alert + AI entry alert) | No (sends analysis summary) |
| Confidence / quality filter | Yes (Grade-A/B+/B+ etc.) | No |
| Trend-alignment filter | Yes | No |
| Grade-A Fast Track option | Yes | No |
| Default credit cost per run | 1 credit per instrument per run | 1 credit per instrument per run |
| Default lifetime of each output | Until trade resolves or expires (30 min intraday / 7d swing) | Until next run |
The rule of thumb: if the deliverable is "a trade I might take" → AI Trader. If the deliverable is "a report I want to read" → Automated Analysis.
Getting Started
Open the sidebar, click Automations. The hub loads with the Dashboard tab selected by default. What you see depends on your subscription tier.
Default agents per tier
Every paid tier ships with at least two Master AI Trading Agents pre-installed and running on the New York AM session schedule. You cannot delete them (only pause them), and you cannot modify their strategy (only their notification settings on your local copy). They are the easiest possible on-ramp.
| Tier | Master AI Traders included | Schedule | Other defaults |
|---|---|---|---|
| Lite | XAUUSD, USDJPY | 9:30 / 10:00 / 10:30 EST | No Automated Analysis agents |
| Pro | XAUUSD, USDJPY, EURUSD, NAS100 | 9:30 / 10:00 / 10:30 EST | No Automated Analysis agents |
| Elite | XAUUSD, USDJPY, EURUSD, NAS100, US500 | 9:30 / 10:00 / 10:30 EST | No Automated Analysis agents |
| Max | XAUUSD, USDJPY, EURUSD, NAS100, US500, US30 (the full 6) | 9:30 / 10:00 / 10:30 EST | No Automated Analysis agents |
The six masters are: XAUUSD, USDJPY, EURUSD, US500, NAS100, US30. Tiers below Max see locked previews of the masters they do not own — same card, dimmed, with a red lock icon and an Upgrade to
First-run path
- Open the AI Trading Agents hub from the sidebar. You land on the Dashboard tab.
- Skim your fleet. You should see one card per default agent. If you are on Lite you will see two cards plus locked previews; on Pro you will see four cards plus locked previews; on Elite you will see five plus one locked preview; on Max all six masters are unlocked.
- Recognize the agent state icons. Each card has an animated state pill — Analyzing, Monitoring, Trading, Waiting, or Sleeping (see the Reading the Dashboard section for the full state table).
- Read the Performance Banner at the top — it tells you how your fleet has performed today, this week, this month, and this year.
- Open the Trades tab to see any live trades from your agents. On a Master-only fleet this is empty until the first 9:30 AM run completes.
- Open the Configure tab to see the underlying configs, edit a master copy, or create a new agent.
The "Demo Trading first" doctrine
Before you connect a Trading Bridge and let any of these agents fire orders into a live account, run them in demo mode for at least one full week. The doctrine is unchanged from the previous chapter:
- Your job in week one is to observe, not to make money.
- Watch how the AI Entry Evaluator approves and rejects setups. You want to develop a feel for the agent's "voice" before you trust it with capital.
- Compare the agent's win rate (in the Performance Modal) to your own historical manual win rate on the same instruments. If the agent is materially worse, you almost certainly chose the wrong strategy in the wizard — go back and pick Smart Scan AI (the recommended default) instead of a strategy-typed scan.
- When you flip a Trading Bridge to live, do it on one agent first, with a small position size, for a full week. Then graduate.
The Hub Layout — 3 Tabs + Right Rail
Every screen in the AI Trading Agents hub is built around the same chrome:
- A top bar with the page title, BETA pill, a 3-button tab group (Dashboard / Trades / Configure), and two primary CTAs on the right (Automate Analysis and Create AI Trader).
- The active tab content below, taking the bulk of the page.
- A right-rail Performance Panel (desktop only, ≥
mdbreakpoint, user-collapsible) that surfaces fleet performance and the Trend Agent without leaving the page.
Tab: Dashboard (default)
The Dashboard is your fleet view. It shows one card per AI Trading Agent you own, color-coded by class (magenta for AI Trader, blue for Automated Analysis, gray for Paused). Each card is a live agent — it animates, shows the current state, lists today's monitored trades inline, and reports today's P/L.
The Dashboard is the screen you should open first thing in the morning. If a card is Sleeping at 9:35 AM that is a problem worth investigating.
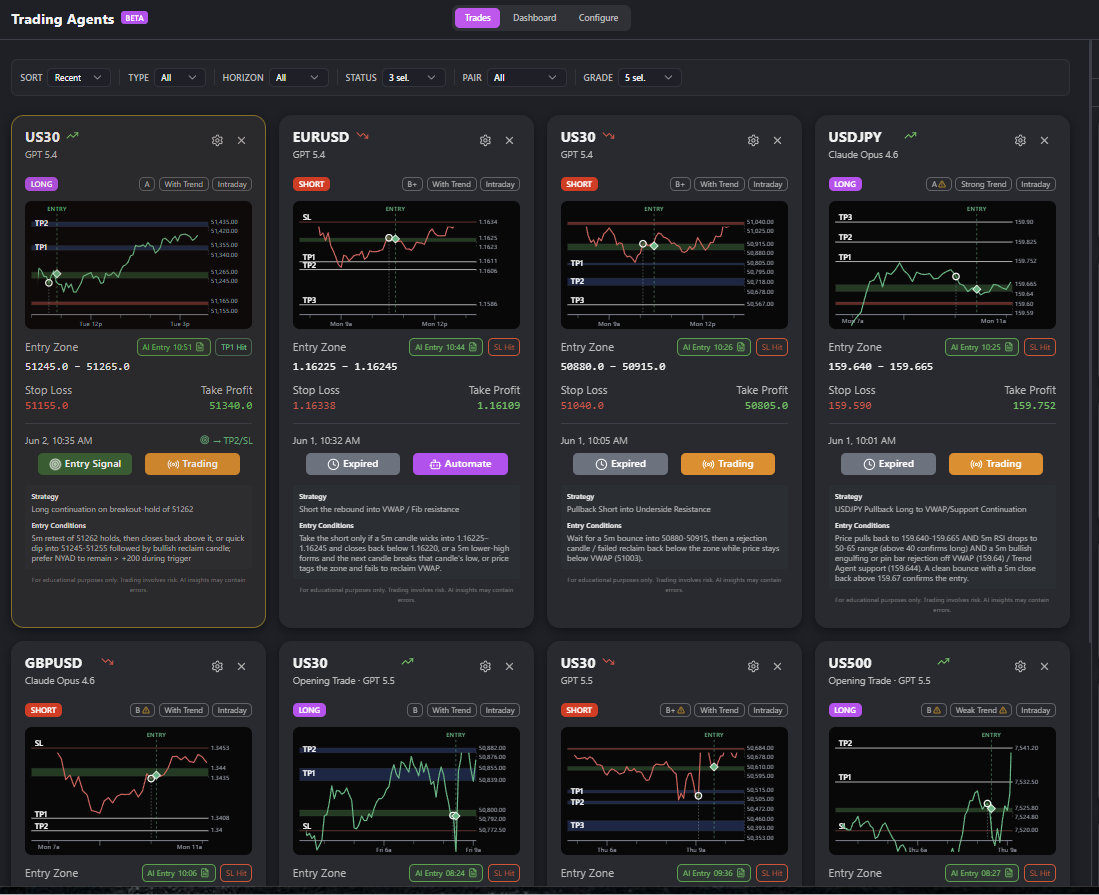
Tab: Trades
The Trades tab is your monitored trades view — every setup your fleet has produced, recent first. This is the screen you keep open while the New York session runs. It has a heavy filter bar (Status × Pair × Grade × Horizon × Type), a card-vs-table view toggle, and a banner system at the top that surfaces "the next 30 seconds of attention you should give the market". See the Reading the Trades Tab section.
Tab: Configure
The Configure tab is your config inventory — one row per AI Trading Agent showing the raw configuration: instruments, schedule, model, strategy prompt, filters, alerts. This is the screen you visit when you want to edit a master copy's notifications, build a new agent, or pause/delete one. See the Reading the Configure Tab section.
Right-rail Performance Panel
On desktop (≥ md) a vertical panel renders to the right of the main content. You can collapse it with the chevron in its header (state persists per user). The panel has two view tabs:
- Trend Agent — read-only display of the Trend Authority Agent for the instruments your fleet covers. See the AI Intelligence Agents chapter of this guide.
- My Automations — performance cards for each of your AI Trading Agents. Click a card to open the Performance Modal (see the Performance Modal section).
See the Right-Rail Performance Panel section for the right-rail in detail.
Empty state
If you have no AI Trading Agents (this only happens to users on a trialless Free account or if you have hidden all masters and deleted all customs), the Dashboard renders the EmptyAutomationsState component: a centered illustration, a one-paragraph explainer, and two CTA buttons that open the wizards.
Reading the Dashboard
The Dashboard tab is the heart of the daily workflow. Three regions stack vertically:
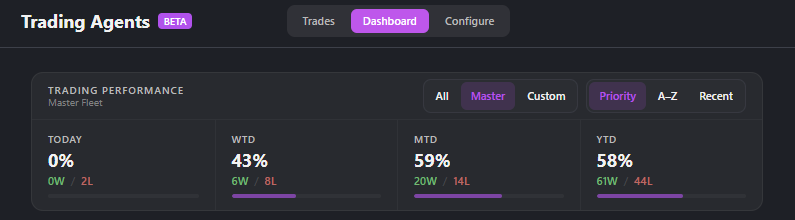
- The Performance Banner (4 columns: TODAY / WTD / MTD / YTD).
- The Master / Custom scope toggle + Sort control.
- The agent card grid (responsive: 1 col mobile, 2 cols tablet, 3 cols desktop on wide layouts).
The Performance Banner
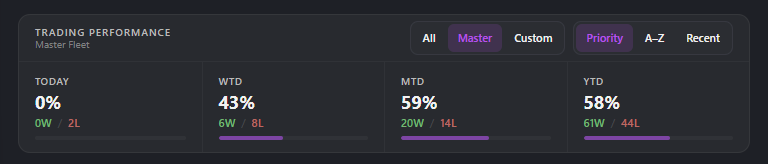
The banner aggregates every closed trade across your fleet for four windows:
| Column | Window |
|---|---|
| TODAY | Today's session in your timezone |
| WTD | Week to date (Monday 00:00 → now) |
| MTD | Month to date (1st 00:00 → now) |
| YTD | Year to date (Jan 1 00:00 → now) |
Each column shows:
- Win rate % — large numerator. A "win" = the trade hit TP1 or higher (TP1 + TP2 + TP3) before the stop loss. A loss = the trade hit SL or was stopped out manually. Cancelled, expired, and waiting trades do not count in either direction.
- W/L count — the raw numerator under the percent, e.g., "3W / 1L".
- Progress bar — visualization of the win rate (emerald fill).
If no trades closed in a window the column shows "—". The banner ignores Automated Analysis agents entirely — only AI Trader output counts.
Each tile is clickable. Click any TODAY / WTD / MTD / YTD tile to open the Performance Drilldown for that window (covered next). The selected tile gets a purple border so you can see which period the drilldown is reading.
The Performance Drilldown
Click any TODAY / WTD / MTD / YTD tile in the Performance Banner and the dashboard opens a drilldown view for that period: a full read of the underlying trades with stats, filters, and a sortable table — all without leaving the Dashboard tab. This is where you actually understand how each AI Trader (and your fleet as a whole) is performing.
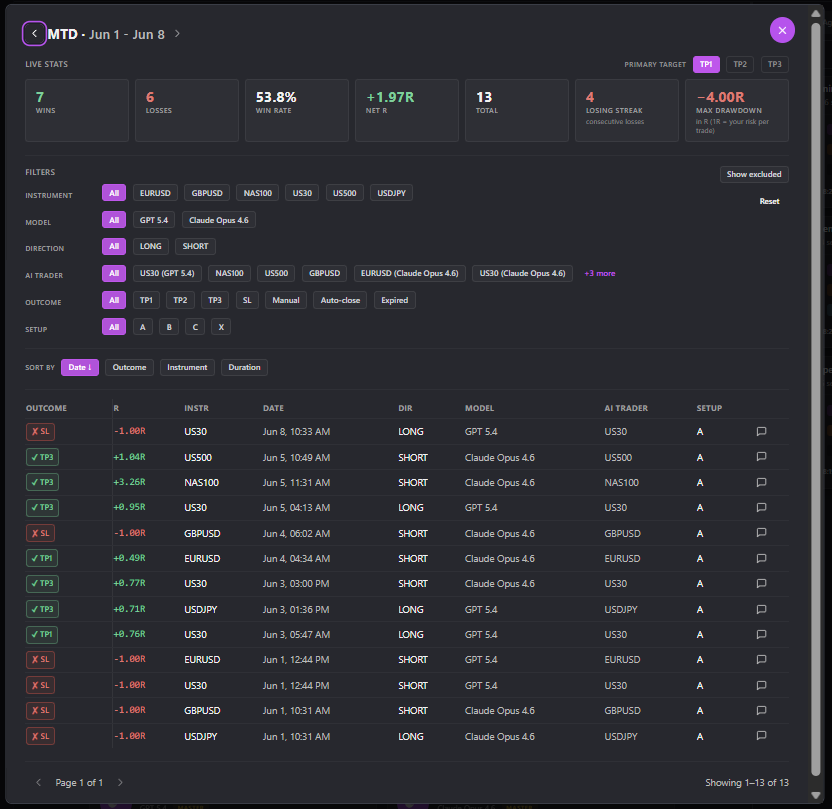
Period scrubber
The header shows the current window (e.g., MTD · Jun 1 – Jun 8) with left and right arrows to step backward and forward through periods. You can walk all the way back to the first trading day of the year without leaving the dashboard.
Live Stats
A row of seven aggregate metrics across every trade that matches your current filters. Numbers update live as you change filters.
| Metric | What it measures |
|---|---|
| Wins | Trades that hit your selected Primary Target or higher |
| Losses | Trades that hit SL or closed manually at a loss |
| Win Rate | Wins ÷ (Wins + Losses), as a percentage |
| Net R | Sum of every R-multiple result in the period. Positive = profitable window |
| Total | Wins + Losses (cancelled / expired / waiting trades excluded) |
| Losing Streak | Longest consecutive losses in the period. Shows "need N trades" until you have ≥ 10 closed |
| Max Drawdown | Worst peak-to-trough R drop in the period. Also locked until ≥ 10 closed trades |
Primary Target — TP1 / TP2 / TP3
A toggle in the top-right of the Live Stats row. It changes what counts as a "win" for the stats above.
- TP1 (default) — any trade that hit TP1 or higher is a win.
- TP2 — only trades that hit TP2 or higher.
- TP3 — only trades that hit TP3.
Toggle through them to see the same period under three risk tolerances. Useful when you're deciding whether to partial-close at TP1 or let a runner go.
Filters
A vertical filter rail. All filters AND-combine — picking values across multiple rows narrows the set:
- Instrument — All, then every instrument with at least one closed trade in the period.
- Model — GPT-5.4, GPT-5.5, Claude (whichever AI Trader models you've used).
- Direction — LONG / SHORT.
- AI Trader — pick one specific agent to see only its results.
- Outcome — TP1 / TP2 / TP3 / SL / Manual / Auto-close / Expired.
- Setup — Confidence grade A / B / C / X (excluded from stats).
Two helpers at the top-right of the rail:
- Show excluded — toggles whether Grade-X (excluded) trades appear in the table. They never count toward Live Stats.
- Reset — clears every filter back to "All".
This is the "by themselves, by groups" view: pick one AI Trader to see how it personally performed; pick multiple instruments to see your fleet's performance on a slice.
Sort
Underneath the filters, a Sort by row: Date · Outcome · Instrument · Duration. Date is default-descending (newest first).
Trades table
One row per trade in the filtered set.
| Column | Notes |
|---|---|
| OUTCOME | Color-coded badge: green TP1/2/3, red SL, gray Manual / Auto-close / Expired |
| R | The R-multiple result, signed. +1.27R, -1.00R, etc. |
| INSTR | Instrument symbol |
| DATE | Trade open date and time |
| DIR | LONG / SHORT |
| MODEL | Which AI model generated the setup |
| AI TRADER | The agent that produced the trade |
| SETUP | Confidence grade at the time the AI approved entry |
| chat icon | Jump to the original analysis conversation that produced this trade |
Pagination shows at the bottom: < Page N of M > with "Showing X–Y of Z". 10 trades per page by default.
Questions the drilldown answers
- "Which of my AI Traders is actually pulling its weight this month?" → MTD tile, filter by AI Trader, scan Net R per agent.
- "Is my fleet losing on counter-trend trades?" → any period, filter by Direction, compare Win Rate.
- "Was last week's loss the agent's fault or just SL noise?" → WTD tile, click the chat icon on the trade row, read the original analysis.
- "Are Grade A setups actually outperforming Grade B?" → toggle Primary Target through TP1/TP2/TP3 with Setup A vs B and compare.
Close the modal with Esc or the X button to return to the dashboard with all your agent cards exactly where you left them.
Master / Custom scope toggle
A small two-button group above the grid:
- Master — only show the master agents (the ones provisioned with your tier).
- Custom — only show agents you created yourself in the wizard.
- (Some installs also expose All — combined view.)
The toggle persists in localStorage so you land on your preferred view next session.
Sort
A dropdown to the right of the scope toggle. Options:
- Most active (default) — agents with monitored trades first, then by recency of last run.
- By P/L — today's R-multiple gain descending.
- Alphabetical — by name A-Z.
Agent Card Anatomy
This is the most data-dense surface in the hub. A single card shows you, at a glance:
- The agent's identity (avatar, name, model, class pill).
- What the agent is doing right now (state icon + typewriter sentence).
- What trades the agent is monitoring (inline pills with status indicators).
- What instruments it covers (chips).
- Today's P/L in R-multiples.
- Risk % per trade.
The avatar / state icon
A circular avatar at the top-left of the card. It renders one of five state icons, each with a distinct animation:
| State | Icon style | Animation | Meaning |
|---|---|---|---|
| Analyzing | Brain | Pulse | A scheduled run is in flight right now. The Analysis Agent is calling the model. |
| Monitoring | Radar | Sweep | At least one trade from this agent is showing Alert ON or In Zone. |
| Trading | TrendingUp | Steady glow | At least one trade is live in the market (broker has filled the entry or the app shows price has triggered the entry). |
| Waiting | Hourglass | Slow tick | Agent is between scheduled runs. No active trades. |
| Sleeping | Moon | None | Agent is paused, or schedule for today has finished and tomorrow's hasn't started. |
These animations are intentional. A pulsing Analyzing icon at 10:00:03 AM tells you the cron fired. A Sleeping icon at 10:05 AM when you expected a run tells you the agent skipped (probably the news-blocking window — check the Configure tab).
Name, model badge, class pill
To the right of the avatar:
- Agent name — what you (or the master template) named it. Bold.
- Model badge — a small pill showing the AI model the agent currently uses (e.g.,
Opus 4.6,Sonnet 4.6,Haiku 4.5). The model is the one configured in the wizard's Step 1. You can change it any time via the Edit modal. - Master / Custom pill — magenta "MASTER" pill if it is a master agent (or your editable copy of one), or "CUSTOM" pill if you built it from scratch.
- Pin / Bookmark icon — toggle that pins the card to the top of the Dashboard regardless of sort.
Typewriter sentence
A line of italic body text below the name that types itself out one character at a time, then loops to the next sentence. Sentences are generated from the agent's current state and active trades:
- "Monitoring NAS100 long setup, price 12 pips from entry zone."
- "Sleeping until 9:30 AM EST tomorrow."
- "Just hit TP1 on XAUUSD short, trailing for TP2."
The sentence is not decorative — it surfaces the most important fact about the agent right now, in plain English, so you do not have to expand the card to learn it.
AI History (FileText icon)
A small icon next to the typewriter sentence. Click it to open the AI History Dialog — a chronological feed of every AI Entry Evaluator decision the agent has made today, with timestamps, instrument, direction, decision (APPROVED / REJECTED), and the AI's one-line reasoning.
This is the surface you open when you want to ask "why didn't the agent take that obvious setup?" — the answer is in the AI History.
Live trade pills
If the agent has any trades still in motion (badges: Alert ON, In Zone, AI Approved, Entry Signal, or live in-market), each renders as an inline pill on the card:
[NAS100 ↑] [● TP1 ✓ TP2 ✓ TP3 — Active]
The pill includes:
- Instrument + direction arrow.
- TP ticks — checkmark on TPs already hit, dash on pending.
- Active dot (green) if entered, Watching dot (yellow) if in zone but not entered, SL red dot if stopped out.
- Entry → TP price in tiny monospace under the pill.
Click any pill to scroll the Trades tab to that card.
Instrument chips
Below the trade pills, a row of small chips with the instruments the agent is configured to scan (e.g., NAS100, US500, XAUUSD). Cosmetic — they tell you the scope of the agent without opening the Configure tab.
State chip
A larger badge in the bottom-left of the card mirroring the state icon's text label: "MONITORING", "ANALYZING", "TRADING", "WAITING", "SLEEPING".
Today P/L (R-multiples)
Bottom-right corner. The sum of today's closed-trade outcomes in R-multiples, color-coded:
- Green: positive (e.g.,
+2.4R) - Red: negative (e.g.,
-1.0R) - Gray: zero or no closed trades (
—)
R-multiples make P/L comparable across instruments — +2.4R on XAUUSD and +2.4R on NAS100 mean the same thing relative to your risk budget. See the Glossary section.
Risk % per trade
Above or beside the P/L: the risk per trade the agent uses to size positions when it auto-executes through the Trading Bridge. Default is 1% of account balance per trade. You can change it via the Edit modal.
The "Create AI Trader" dashed CTA card
At the very end of the agent card grid you will see a dashed-border placeholder card with a "+" icon and the text "Create AI Trader". Click it to open the Generate Trade Ideas wizard (see the Wizards section). It is always there, even when your fleet is full — it is the fastest way to start a new agent without leaving the Dashboard.
Reading the Trades Tab
The Trades tab is the second most-used surface in the hub. It is where you watch live setups develop and where you take (or skip) action on the agent's recommendations.
The tab has three regions stacked vertically:
- The Filter Bar.
- The Banner System (between the filter bar and the grid).
- The Trade Card grid or Trade Table (toggle in the filter bar).
Filter Bar
A dense row of dropdowns and pills:
Sort (single-select)
| Option | What it does |
|---|---|
| Priority (default) | Status tier (Entry Signal → In Zone → Alert ON → closed), then proximity to entry zone for armed trades |
| Recent | Newest started_monitoring_at first |
| Expiring | Trades closest to monitoring lifetime expiry first |
| Grade | Highest confidence grade first (A+ → C) |
Type (segmented control)
| Option | Includes |
|---|---|
| All | Intraday + Swing |
| Intraday | Intraday-style trades only (default trading mode for most users) |
| Swing | Swing-style trades only (requires Swing trading mode in Settings) |
Horizon (segmented control)
| Option | Time window |
|---|---|
| Today | Started monitoring today |
| Yesterday | Started monitoring yesterday |
| 7d | Last 7 days |
| 30d | Last 30 days |
| All | No filter |
Status (multi-select dropdown — full state table)
Each trade flows through a small set of badges from setup to close. You can multi-select any combination.
| Badge | Stage | What it means |
|---|---|---|
| Alert ON | Pre-entry | Price has not reached the entry zone yet. The trade is armed and waiting. |
| In Zone | Pre-entry | Price is inside the entry zone. The AI Entry Evaluator is checking every 60s. |
| AI Approved | Pre-entry | The AI has approved entry — waiting one more price tick for confirmation. |
| Entry Signal | Confirmed | The AI has approved entry and price has confirmed. The alert fires now (and Trading Bridge places the order if enabled). |
| TP1 Hit | Live (partial) | First take profit hit. Trade continues toward TP2. |
| TP2 Hit | Live (partial) | Second take profit hit. Trade continues toward TP3. |
| TP3 Hit | Closed — Win | Final take profit hit. Trade closed at full profit. |
| SL Hit | Closed — Loss | Stop loss hit. Trade closed at full loss. |
| Manual Exit | Closed | You manually closed the trade. |
| Cancelled | Closed | You cancelled monitoring before entry. |
| Expired | Closed | Monitoring lifetime ran out before entry. |
| Paused | Pre-entry | Monitoring is paused for this trade — the AI Entry Evaluator is not running until you resume. |
Pair (multi-select dropdown)
A list of every instrument any of your agents has produced a trade for in the last 30 days. Multi-select to filter the grid.
Grade (multi-select dropdown)
The confidence grade buckets the AI assigned to each setup at creation time.
| Grade | Numeric threshold | Label |
|---|---|---|
| A+ | 9.0 – 10.0 | Exceptional setup |
| A | 8.0 – 8.9 | High probability |
| B+ | 7.0 – 7.9 | Above average |
| B | 6.0 – 6.9 | Moderate probability |
| C | < 6.0 | Lower probability |
View-mode toggle: Cards vs Table
At the right end of the filter bar, two toggle buttons: Cards (default — the rich Trade Card view) and Table (a dense TradesTableView for power users who want to see 20+ trades on screen at once). The toggle persists in localStorage.
Pagination
Card view paginates at 8 cards per page with a numbered pager at the bottom. Table view paginates at 25 rows per page.
The Banner System
Above the grid, up to three colored banners can appear at any time. They are the "next 30 seconds of attention" surface — they collapse the most urgent information across your fleet into a single line each.
Banner 1 — AI Entry Confirmed (emerald)
Triggers when any trade in your fleet shows the Entry Signal badge (or has just gone live in the market) within the last 5 minutes. Shows: "AI Entry Confirmed on [PAIRS]" with one pill per instrument. Click a pill → page scrolls to and highlights that trade card.
Banner 2 — In Zone, awaiting AI (yellow)
Triggers when any trade shows the In Zone badge and the AI Entry Signal is enabled. The AI is actively evaluating. Shows: "In zone, AI is evaluating: [PAIRS]". Pills behave the same way.
Banner 3 — In Zone, AI off (amber)
Triggers when any trade shows the In Zone badge but the AI Entry Signal is disabled for that agent. Shows: "Trades in zone, AI is off. Decide manually." Includes a Turn On AI button that updates the agent to enable AI monitoring for future trades and prompts you to confirm.
Dismissal & persistence
Each banner has a small "x" to dismiss. Dismissals are scoped per-banner-type and persist for 30 minutes in localStorage. If the same condition re-fires after 30 minutes the banner returns.
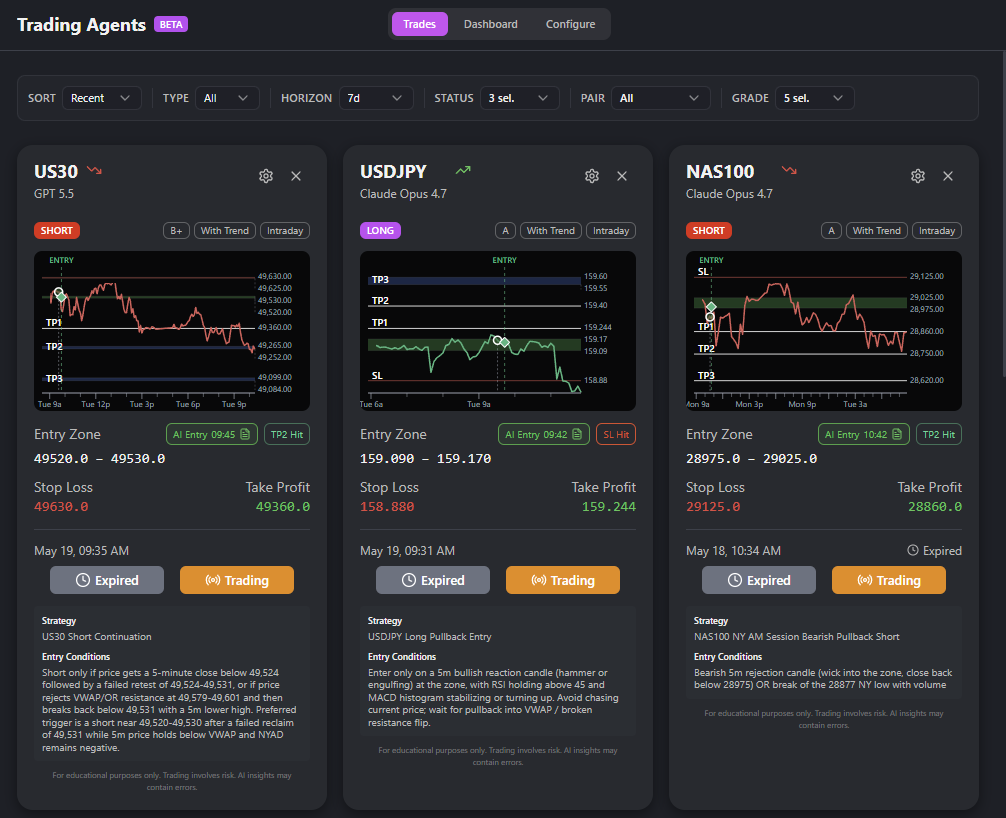
Reading a Trade Card
The Trade Card is the most information-dense single component in the entire app. Reading it well is the single biggest skill upgrade you can get from this guide.

Header
- Instrument in large bold (e.g.,
NAS100). - Trader subtitle — the name of the agent that produced this trade, prefixed with "from " (e.g., "from NAS100 Master").
- Direction arrow — green ↑ for long, red ↓ for short.
- Settings gear (right side) — opens the gear menu (see below).
- Delete X (far right) — removes the trade from the dashboard. This does NOT cancel monitoring if the trade is still active; see "Delete vs Cancel" below.
Badges row
A row of 4–5 small badges immediately under the header:
Direction badge
LONG (green) or SHORT (red).
Confidence Grade badge (with tooltip)
The grade letter (A+, A, B+, B, C) and a numeric score 1.0–10.0. Hover for the AI's one-paragraph rationale on why it gave the setup this grade.
Trend Alignment badge
One of: With Trend, Strong Trend, Counter-trend, Ranging, Weak Trend, Choppy. Color-coded (emerald → amber → red). Hover for a tooltip explaining what each label means in the current market context.
Trade Style badge
Swing or Intraday. Tooltip explains the validity window — Intraday setups expire end-of-day, Swing setups are valid for up to 7 days.
Auto-Close indicator
A small icon present only when the trade was created by an agent with auto_execute_trades: true. Indicates the Trading Bridge will manage entry, SL, and TPs.
Live chart
An embedded TradingView-style chart (EmbeddedTradeChart) showing the last 6 hours of 1-minute candles for the instrument. The chart refreshes every 15 seconds. The entry zone, SL, and TP levels are overlaid as horizontal lines. This is your primary visual anchor.
Entry Zone (with inline AI badges)
A row showing the entry zone (e.g., 12,840.50 → 12,852.00) with up to three inline badges:
AI Monitoring Badge
A small magenta pill that says "AI Monitoring". It appears when the trade is showing Alert ON or In Zone and the AI Entry Signal is enabled on the parent agent. Hover: "The AI Entry Evaluator runs every 60s while price is in the zone."
AI Entry Badge
A larger purple pill that says "AI ENTRY APPROVED" or "AI ENTRY REJECTED". Only renders after the AI has made a decision on the current zone visit. Hover for the AI's reasoning.
Outcome Badge
After the trade closes, replaces the above with "TP1 HIT", "TP2 HIT", "TP3 HIT", "STOPPED OUT", "EXPIRED", or "CANCELLED" with appropriate colors.
Stop Loss
The SL price + the pip distance + the negative R contribution (e.g., SL 12,820 (−18 pips, −1.0R)).
Take Profit (3 levels)
TP1, TP2, TP3 rendered as a vertical stack with prices, pip distances, and R-multiples (e.g., TP1 12,872 (+22 pips, +1.2R)). Each TP has a small checkmark icon that fills in emerald once that TP is hit.
Footer
A row at the bottom of the card with:
- Timestamp — when the trade was created (e.g., "Created 9:32 AM").
- Time remaining or next target — either "Expires in 22 min" (if still showing Alert ON or In Zone) or "Next target: TP2" (if live and partial-hit).
- Entry Alert button — status-colored. Click to manually mark "I took this entry" (useful when you trade by hand off the alert instead of letting the Bridge do it).
- Automate/Trading button — purple if the parent agent has Trading Bridge off; orange if Trading Bridge is on. Click to open the TradingBridgeConnectionModal for this specific trade (per-trade override).
Optional Strategy + Entry Conditions block
Below the footer, a collapsible block (default collapsed) showing the AI's text rationale: which strategy fired (Pullback Reversal / Breakout / Trend Continuation / Smart Scan), what the entry conditions are (e.g., "Wait for hammer candle on 5m timeframe + RSI < 35"), and any caveats.
Disclaimer
A tiny gray line at the very bottom: "Educational only. Not financial advice. Trade at your own risk."
Gear menu (settings)
Clicking the gear icon opens a dropdown with up to 6 actions. Which actions show depends on the trade's current status.
| Action | Shows when | What it does |
|---|---|---|
| Edit Settings | Always | Opens EditAutomationModal scoped to this trade's parent agent. |
| Configure Automation | Trade is from a custom agent | Jumps to the Configure tab and scrolls to the parent agent. |
| View in Chat | Always | Opens the original chat thread where the AI produced this setup. |
| Pause Monitoring | Badge is Alert ON or In Zone | Pauses the AI Entry Evaluator for this trade only. Trade stays alive. |
| Stop Monitoring | Badge is Alert ON, In Zone, AI Approved, or Entry Signal | Ends monitoring. Trade transitions to Cancelled. Cannot be undone for this row, but you can use Restart Monitoring to create a new monitoring session on the same setup. |
| Restart Monitoring | Trade is closed (Cancelled, Expired, SL Hit, TP3 Hit) | Re-arms a new monitoring session with the same entry/SL/TP. Useful when a setup was right but you cancelled too early. |
Stop Monitoring vs Delete Trade
These two actions look similar but are not the same.
- Stop Monitoring (via gear menu) — stops the AI Entry Evaluator from running and transitions the trade to the Cancelled badge. A confirmation dialog opens — the dialog title may say "Cancel" but the user-facing action label in the gear menu is Stop Monitoring. The card stays on the Trades tab for historical visibility and eventually rolls off the 30-day horizon.
- Delete Trade (via the X icon in the card header) — removes the row from your Dashboard view. It does NOT stop monitoring if the trade is still active. If you delete an active trade, it continues monitoring silently and the AI will still notify you at the entry — you just won't see the card. Use Delete only on terminal trades you want to clear.
Restart Monitoring — practical use
If you stopped monitoring on a trade too early and price subsequently came back into the zone, you can right-click the (now Cancelled) card → Restart Monitoring. This starts a fresh monitoring session with the same entry zone, SL, and TPs. The AI will re-evaluate from scratch the next time price enters the zone.
Reading the Configure Tab
The Configure tab is the inventory view of every AI Trading Agent in your account, including hidden master copies. It is the lowest-traffic tab in the hub (you rarely visit it during a trading session), but it is where every meaningful change to your fleet happens.
Stats strip (top of tab)
A horizontal strip of 3 numeric tiles at the top of the tab:
| Tile | Meaning |
|---|---|
| Total | Total number of AI Trading Agents in your account (active + paused, including locked masters). |
| Active | Number of agents currently running (not paused). |
| Runs | Total successful runs (success status) across the fleet in the last 30 days. |
Filter Bar
- Source (segmented control) — All / Master / Custom.
- Status (segmented control) — Active / All.
Automation card anatomy
The Configure tab renders agents as denser, wider cards than the Dashboard. Each card shows:
Header row
- Type dot — a 12 px circle. Magenta = AI Trader, blue = Automated Analysis, gray = paused.
- Name — the agent's name.
- Model — the model badge (e.g.,
Opus 4.6). - Stats inline — "8 trades · 24 runs" (last 30 days).
- Tier badge — appears only on master cards: small "MASTER" pill with the required tier.
- Pause / Play toggle — switches active state. Disabled on locked masters.
- Lock icon — appears only on locked master cards.
- External link — opens the parent chat thread for analysis-type agents.
Schedule row
A single line, in priority order, showing one of:
- Last run: 9:32 AM (success) — most recent successful run.
- Pending retry ↻ 11:00 AM — if a run failed and is queued for automatic retry.
- Skipped: News Block or Skipped: Market Open — if today's scheduled time was skipped, color-coded red.
- Next run: 9:30 AM tomorrow — when the next run is scheduled.
- Paused — if the agent is paused, this overrides everything else.
Priority order means: if today's run was skipped AND a pending retry is queued, the retry shows.
3-stat grid (AI Trader only)
A small 3-column grid below the schedule row:
| Stat | Meaning |
|---|---|
| Sessions | Number of distinct trading sessions the agent has run in (last 30 days). |
| Trade Setups | Total setups produced (last 30 days). |
| Avg Setups/Session | Setups ÷ Sessions, rounded to 1 decimal. |
Instruments
A row of chips with the instruments this agent is configured to scan.
Agent Strategy prompt (expander)
A collapsible block showing the full strategy prompt the agent uses (the text from Step 1 of the wizard, either a Smart Scan AI tooltip, a strategy template tooltip, or your custom prompt). Default collapsed.
Trade Quality Filter (badge)
Shows the configured grade threshold: "Grade ≥ A-/B+" (etc.). Hover for the threshold meaning.
"AUTOMATED TRADING ENABLED" highlight
A magenta/orange highlight bar that renders only when auto_execute_trades: true. Indicates the Trading Bridge will fire orders for this agent. Click it to open the Trading Bridge settings page.
"Show in Side Panel" toggle
A small switch. When ON, this agent appears in the right-rail Performance Panel's "My Automations" tab. When OFF, the agent is hidden from the rail (useful for masters you keep enabled but don't actively follow).
History / Settings / Trash icons
The bottom-right of the card has three icons:
- History — opens the ViewHistoryModal with a paginated list of every run, every monitored_trade, and every AI decision the agent has ever produced.
- Settings — opens
EditAutomationModal(a tabbed dialog that walks the same fields as the wizard but per-step). - Trash — opens
DeleteAutomationModal(custom agents) or CannotDeleteMasterModal (master agents — masters can only be paused, not deleted).
The Right-Rail Performance Panel
The Performance Panel is the always-visible companion to the main content area, rendered on desktop (≥ md) to the right of the active tab. It is the answer to "is my fleet healthy right now?" without leaving the page.
Collapse / expand
A chevron in the panel header collapses the rail to a 24 px sliver. State persists per user. On mobile and small tablets the rail is hidden entirely.
View tabs
Two view tabs at the top of the rail:
Trend Agent tab
A read-only display of the Trend Authority Agent for the instruments your fleet covers. Each instrument gets a small card showing trend direction (bull/bear/ranging), trend strength score, and freshness timestamp. Click a card to open the TrendAgentModal for the full breakdown.
The Trend Agent tab is your shortcut to "is the wind at the back of my fleet right now?" — if NAS100 trend is bearish and your NAS100 agent just generated a long setup, that is a yellow flag worth a second look.
Cross-link: see the AI Intelligence Agents chapter of this guide for what the Trend Agent does and how its scores work.
My Automations tab
A scrollable list of performance cards, one per AI Trading Agent. Each card is a compact AutomationPerformanceCard showing today's win rate, today's R, total runs, and a tiny progress bar. Click any card to open the Performance Modal (see the Performance Modal section).
Filters
Above the cards list:
- Type (segmented control) — All / Trades / Analysis.
- Source (segmented control) — All / Master / Custom.
Settings gear
A small gear icon in the panel header. Click it to jump directly to the Configure tab.
Locked master cards
If you are on Pro and you have locked NAS100, US500, and US30 masters, they still render in the panel as cards — but with a red lock icon, dimmed text, and an Upgrade to Max call to action. Click the card to open a stripped-down preview modal with the upgrade CTA.
Performance card content — AI Trader
For AI Trader agents the card shows:
- TP1 / TP2 / TP3 win rates — three small horizontal bars, color-coded magenta / orange / cyan, with the % win rate next to each.
- Avg R — average R-multiple per closed trade.
- PS % — AI-recommended position size percent (the average across all closed trades).
Performance card content — Automated Analysis
For Automated Analysis agents the card shows only:
- Total runs — last 30 days.
- Last run — timestamp.
No win rate, because analysis agents do not produce trades.
The Performance Modal — 4 Tabs
Clicking any card in the Performance Panel (or "View Performance" from the Configure tab) opens the Performance Modal — the deepest analytics surface in the hub.
The modal has four tabs: Activity, Performance, Trades, Strategy.
Tab: Activity
A chronological timeline of mixed events:
- Run events — every scheduled run, with status (success / skipped / error) and a timestamp.
- Trade events — every monitored_trade row, with status, instrument, direction, and outcome.
Each event has a View Chat link that opens the underlying chat thread (for run events) or the originating analysis (for trade events).
The Activity tab is the answer to "what did this agent do in the last 7 days?".
Tab: Performance
The headline tab. The most data-dense screen in the hub.
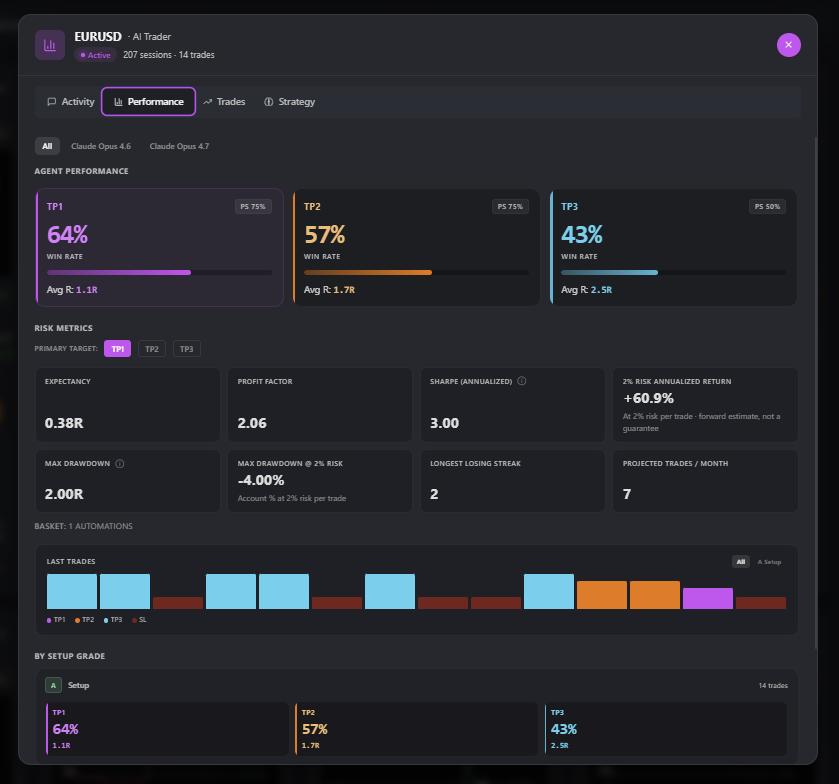
Model toggle
A pill row at the top filtering every stat below by the AI model used. Default: All models. Toggle to e.g. Opus 4.6 to see how just that model performed for this agent.
This is how you A/B-test models. If Sonnet 4.6 and Opus 4.6 both have data for the same agent, the toggle lets you compare directly.
3 TP blocks
Three large blocks horizontally, one for each take profit level:
| Block | Color | Stats shown |
|---|---|---|
| TP1 | Magenta | Win rate %, PS %, Avg R, count, progress bar |
| TP2 | Orange | Win rate %, PS %, Avg R, count, progress bar |
| TP3 | Cyan | Win rate %, PS %, Avg R, count, progress bar |
Win rate here is "% of triggered trades that reached this TP". A TP1 win rate of 72% with a TP3 win rate of 18% is normal and healthy — most setups hit the first target, fewer run all the way.
PS % is the position size percent the AI recommended for trades that reached this TP. Higher PS on TP3 hits than on TP1 hits would suggest the AI's confidence calibration is working (it sized up on the trades that ran the furthest).
Position-sizing rule
The AI's recommended PS% maps to a position size ladder for the Trading Bridge:
| AI PS % | Effective lot multiplier |
|---|---|
| ≥ 70% | 100% of your base size |
| ≥ 50% | 75% |
| ≥ 30% | 50% |
| Else | 25% |
Worked example: Your base risk is 1% of account. The AI's PS% on a NAS100 setup is 58%. The Trading Bridge will size the position at 75% × 1% = 0.75% of account.
Model comparison
A side-by-side mini-table of model stats: each row is a model the agent has used, each column is a key stat (Win rate, Avg R, total trades). Surfaces "is Opus actually beating Sonnet on this agent's market?" — the answer often surprises.
Grade cards (A / B / C)
Three cards horizontally, one for each grade bucket (A = ≥ 8, B = 6.0–7.9, C < 6.0):
- Trade count in the grade.
- Win rate % for trades in the grade.
- Avg R.
- PS %.
Grade cards tell you if the AI's confidence calibration is honest. A healthy agent has A-grade win rates noticeably higher than C-grade win rates. If they're flat (or worse, inverted), the agent's prompt is mis-calibrated and you should pick a different strategy.
Last-trades chart
A small bar chart of the last 14 closed trades, color-coded by which TP they hit (or whether they were stopped out). Filter chip above the chart: ALL / A / B / C — limits the chart to one grade bucket.
Summary grid
A 2×2 grid:
| Cell | Stat |
|---|---|
| Top-left | Total Runs (lifetime) |
| Top-right | Total Trades (lifetime) |
| Bottom-left | Last Run timestamp |
| Bottom-right | Next Run timestamp |
Instruments chips
A row at the bottom showing the instruments this agent scans, each clickable to filter the Trades tab by that instrument.
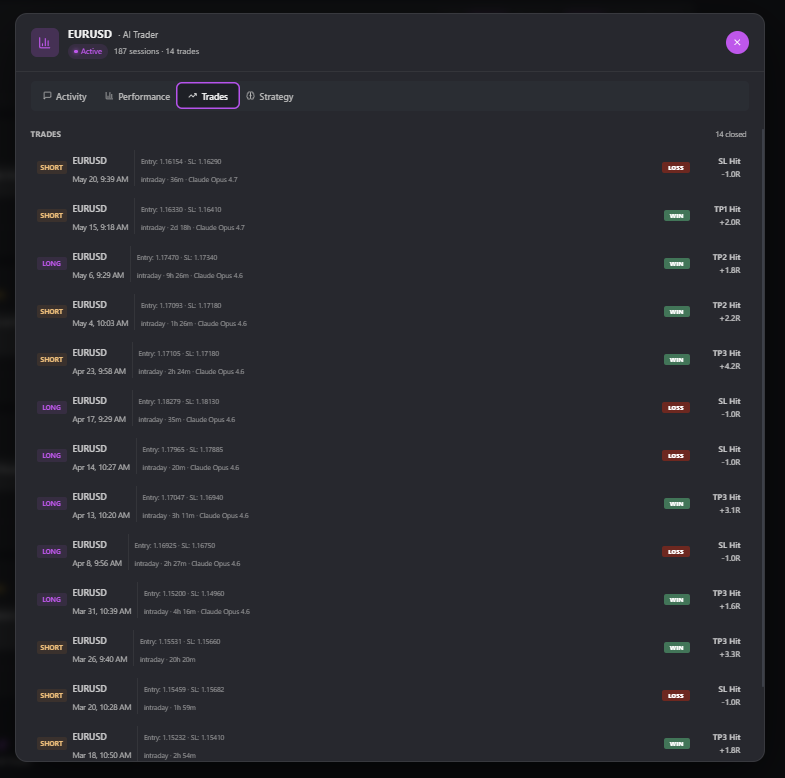
Tab: Trades
A paginated list of every trade the agent has produced. Each row:
- Instrument + direction arrow.
- Date/time.
- Grade letter.
- Outcome (TP1 / TP2 / TP3 / SL / Cancelled / Expired).
- R-multiple.
- A View Chat link.
Sort by recency (default), outcome, or R.
Tab: Strategy

Two stacked sections:
Markdown prompt
The full text of the agent's strategy prompt (Step 1 of the wizard), rendered as markdown. Read-only.
AI Insights (≥ 10 closed trades)
This panel only appears once the agent has accumulated at least 10 closed trades. It is the AI's self-analysis of its own performance, regenerated periodically.
- Trend direction badge — Improving / Stable / Degrading. Color-coded.
- Trend summary — a 2–3 sentence paragraph: "Your win rate is trending up over the last 30 trades. TP2 hits doubled this week."
- Grade insights — what the AI sees in your grade distribution.
- Recommended PS table — per-grade recommended position size percent.
- Key observations — bulleted list of things the AI noticed.
- Risk warnings (amber) — anything concerning, e.g., "Avg R has dropped 30% in the last 7 days; consider reviewing your strategy."
The AI Insights panel is what makes this hub more than a dashboard — the agent grades itself, in plain English, and tells you when to be worried.
AI Self-Analysis Explained
The AI Insights panel on the Strategy tab is the agent's self-analysis. It deserves its own subsection because it is the surface that most readers under-use.
When it shows
The panel appears only when the agent has produced ≥ 10 closed trades. Below that threshold the panel is hidden and a placeholder reads "Need at least 10 closed trades to enable AI Insights." This is intentional — fewer than 10 closed trades is too noisy a sample to draw conclusions from.
How fresh is it
The AI Insights are regenerated:
- Once every 24 hours on a background cron.
- Immediately after the 10th closed trade for a brand-new agent.
- On-demand by clicking a small refresh icon in the panel header (rate-limited to once per hour per agent).
What the trend label means
The trend badge maps to a moving comparison of recent trades vs older trades:
- Improving (emerald) — the last N trades have higher win rate, higher avg R, or both, vs the prior N trades.
- Stable (blue) — performance is flat within noise.
- Degrading (red) — the last N trades are noticeably worse than the prior N.
The exact N depends on the trade count — typically the last 10 vs the prior 10 once you have 20+ trades.
How to act on a Degrading verdict
A Degrading badge is a prompt to investigate, not an emergency. Common causes:
- Market regime change — if the macro market shifted into "extreme" volatility regime (see Macro Agent), even a great agent will underperform. Check the Market Brief page first.
- The agent's strategy is now mis-aligned with the market — e.g., a "Pullback Reversals" agent is having a rough month because the market is trending strongly without pullbacks. Consider pausing and switching to "Smart Scan AI".
- Your filter is too loose — if your grade threshold is B and most of your losses are in C-grade trades, tighten to A-/B+.
- One specific instrument is dragging down the average — open the Trades tab, filter to this agent, group by instrument, and check.
A Degrading verdict does not mean you should panic-delete the agent. Look at the trade count: if you have 12 closed trades and the last 6 happened to be losses, the verdict is statistically thin. Wait until you have 30+ trades before treating the trend label as authoritative.
Master AI Trading Agents
The Master AI Trading Agents (still also called "Master Automations" in the API and URL params) are a set of 6 hand-tuned agents that ship with paid tiers and run on a unified New York AM session schedule. They are the easiest starting point for any user.
The 6 Masters
| Master | Instrument | Class | Schedule |
|---|---|---|---|
| XAUUSD Master | Gold | AI Trader | 9:30, 10:00, 10:30 EST |
| USDJPY Master | USDJPY | AI Trader | 9:30, 10:00, 10:30 EST |
| EURUSD Master | EURUSD | AI Trader | 9:30, 10:00, 10:30 EST |
| US500 Master | S&P 500 | AI Trader | 9:30, 10:00, 10:30 EST |
| NAS100 Master | Nasdaq 100 | AI Trader | 9:30, 10:00, 10:30 EST |
| US30 Master | Dow Jones | AI Trader | 9:30, 10:00, 10:30 EST |
All six use Smart Scan AI as their strategy with carefully tuned filters and prompts that have been validated across thousands of historical trades.
Tier distribution
| Tier | Unlocked masters | Locked previews shown |
|---|---|---|
| Lite | XAUUSD, USDJPY | Other 4 |
| Pro | XAUUSD, USDJPY, EURUSD, NAS100 | US500, US30 |
| Elite | XAUUSD, USDJPY, EURUSD, NAS100, US500 | US30 |
| Max | All 6 | — |
Locked previews render as full-shape cards with a red lock icon overlay and an "Upgrade to
CannotDeleteMasterModal — pause-only
When you click the Trash icon on a master card, the CannotDeleteMasterModal opens with a single message: "Master AI Trading Agents cannot be deleted, only paused." It offers a Pause button as the primary action. This is intentional — masters are tier benefits and should remain in the user's library even when paused, so they can re-enable them later without re-provisioning.
Restore Masters
The legacy manage page (a hidden admin surface) has a button labelled Restore Masters that re-provisions any Master AI Trading Agents missing from your account. This is rarely needed but useful if a master gets orphaned by a billing or migration edge case.
Field restrictions on editing a master copy
When you open Edit Settings on a master agent, most fields are locked (small amber lock icon). What you can edit:
- Notification settings — sound, duration, in-app on/off, Telegram on/off, webhook URL.
- Alert logic — zone-only / conditions-only / any / buffer.
- Show in Side Panel toggle.
What you cannot edit on a master copy:
- The strategy prompt.
- The instruments.
- The schedule.
- The AI model.
- The Trade Quality / Trend Alignment filters.
- The Grade-A Fast Track toggle.
Hovering a locked field shows the LockExplanationPopover — a small popover with the text "This field is locked on master agents. Build your own to customize" and a primary button: "Build my own".
The "Build my own" escape
Clicking Build my own in the LockExplanationPopover does something powerful: it opens the Generate Trade Ideas wizard with every field from the master pre-filled. You can then change any of the locked fields and save the result as a brand-new custom AI Trader, with the master left intact.
This is the canonical path from "I want to tweak the XAUUSD master a bit" to "I have my own XAUUSD agent based on the master".
The Wizards
There are two wizards in the hub, one for each agent class. Both are reached from the top-bar buttons (Create AI Trader and Automate Analysis) or from the dashed CTA card at the end of the Dashboard grid.
Generate Trade Ideas Wizard (7 steps)
The wizard that builds an AI Trader. 7 steps, each step is a single page with a progress strip at the top.
Step 1 — Strategy & Model
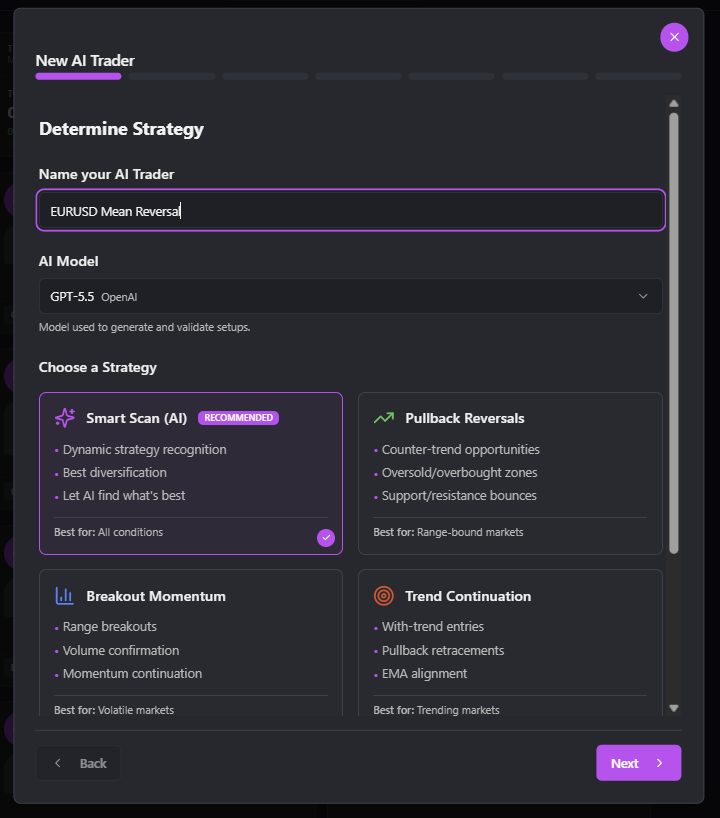
Name
Text input. Required. Max 100 characters. Must be unique within your account — a yellow warning appears if you already have an agent with the same name. Tip: name agents after the market they cover and the time they run, e.g., "NAS100 AM Scan" or "XAUUSD London Open".
AI Model
A dropdown (AiModelSelect) listing the available AI models. The default is the project's WIZARD_DEFAULT_AI_MODEL constant (claude-opus-4-6). Other options are claude-opus-4-7, gpt-5.4-2026-03-05, and gpt-5.5-2026-04-23. The model is used to:
- Generate the trade setups on each scheduled run (the Analysis Agent).
- Re-evaluate every setup at the moment of entry (the AI Entry Evaluator).
Pricing note: more powerful models consume more credits per run. Opus consumes ~3× the credits of Sonnet for the same workload. Pick Opus for the master XAUUSD / NAS100 agents where the cost is justified by trade quality; Sonnet is fine for daily Automated Analysis.
Strategy (4 cards + custom)
Four strategy cards in a 2×2 grid:
Smart Scan AI (recommended)
The default. Dynamic strategy recognition — the AI examines current market conditions and picks the best strategy on each run (pullback, breakout, trend continuation, mean reversion). This is the right answer for >80% of users because:
- It diversifies across strategies automatically, which is the single biggest performance driver across a multi-month sample.
- It adapts to regime changes — when the market shifts from ranging to trending, Smart Scan switches its style without you having to re-configure.
- It is the strategy used by all 6 Masters.
Tooltip text: "Give me trade setup ideas, only high probability, with entry zone, entry trigger, logical stop loss zone(s), and take profit level(s)."
Pullback Reversals
Counter-trend pullback opportunities within established trends. Scans for oversold / overbought conditions near key support/resistance with RSI divergence confirmation. Best in range-bound markets.
Tooltip: "Find counter-trend pullback opportunities within established trends. Scans for oversold/overbought conditions near key support/resistance levels with RSI divergence confirmation."
When to pick it: you want a specialist agent that only catches "fade the high / fade the low" trades. Pair with a tight grade filter (A or A+).
Breakout Momentum
High-probability breakouts from consolidation ranges. Looks for price expansion with strong volume, volatility spikes, and follow-through momentum. Best in volatile markets.
Tooltip: "Identify high-probability breakouts from consolidation ranges. Looks for price expansion with strong volume, volatility spikes, and follow-through momentum."
When to pick it: high-volatility regimes (VIX > 25), CPI weeks, earnings season.
Trend Continuation
Captures continuation moves in established trends. Scans for healthy pullbacks to moving averages with MACD confirmation and trend structure alignment. Best in trending markets.
Tooltip: "Capture continuation moves in established trends. Scans for healthy pullbacks to moving averages with MACD confirmation and trend structure alignment."
When to pick it: when you can see a multi-day trend on the daily chart and want to ride pullbacks back into it.
Custom Prompt
A textarea below the strategy cards. If you type anything in it, the four strategy cards de-select and the wizard uses your custom prompt instead. Max 5000 characters.
Custom prompts are the path to "I want my own strategy I have been trading manually for years, replicated by the AI". Tips:
- Be specific about timeframe (1H / 4H / Daily).
- Mention the indicators you care about (EMA 50, RSI 14, MACD).
- State the entry signal in plain English (e.g., "Hammer candle at the EMA 200").
- State the invalidation in plain English (e.g., "Stop loss below the previous swing low").
Example custom prompts visible in the wizard helper:
- "Find EURUSD pullbacks to 50 EMA on 4H with RSI < 40"
- "Scan for breakouts above yesterday's high with volume > 1.5x avg"
- "Look for hammer candles at support levels on 1H timeframe"
Cross-link: see the Prompt Engineering chapter of this guide for a deeper guide to writing custom strategy prompts.
Step 2 — Instruments
The InstrumentSelector component — a 4-tab grid:
| Tab | Instruments |
|---|---|
| Forex | EURUSD, GBPUSD, USDJPY, USDCAD, AUDUSD, NZDUSD, EURJPY, GBPJPY, ... |
| Indices | US500, NAS100, US30, DAX40, FTSE100, NIK225, ... |
| Commodities | XAUUSD, XAGUSD, WTIUSD, NATGAS, ... |
| Crypto | BTCUSD, ETHUSD, ... |
Pick the instruments the agent should scan on each run. Important cost note: the cost per run scales linearly with instrument count. An agent with 1 instrument running 3×/day costs 15 credits/week; an agent with 5 instruments at the same schedule costs 75 credits/week.
Recommendation: pick 1–3 highly correlated instruments per agent. The masters use exactly 1 instrument each — this is by design. It gives the AI a tight focus.
Step 3 — Schedule & News
Two components:
TimeScheduler
- Schedule times — add as many times as you want, in your local timezone. The wizard converts to UTC for storage and back to local for display.
- Days of week — checkboxes Mon–Sun, default Mon–Fri.
- DST session — advanced toggle that pins the agent's schedule to a specific session timezone (e.g., America/New_York) so it follows DST automatically even if your account timezone differs.
NewsEventHandling
Four options for how the agent handles high-impact economic events:
| Option | Behavior |
|---|---|
| run_after_no_market_open (default) | Run after the news prints, but skip if market is not yet open. Safest default. |
| run_after | Always run after the news prints, even if it means running outside session hours. |
| ignore | Run on schedule regardless of news. Useful for non-news-driven instruments. |
| skip | Skip the run entirely if a high-impact event is within ±15 minutes. |
For US equity indices on NFP / CPI / FOMC days, run_after_no_market_open is the recommended choice — you get the post-news analysis with the actual print baked in, but you don't fire orders into a closed market.
Step 4 — Alert Setup

The most option-rich step. Backed by the MonitoringAlerts component.
Entry Zone Alerts
- Checkbox to enable.
- Sound type dropdown (8+ sound options).
- Sound duration dropdown (1, 3, 5, 10 seconds).
- A play button to preview the sound.
When ON, the system notifies you the moment price first touches the entry zone, regardless of whether the AI has approved the setup.
AI Entry Signal (highlighted section)
A highlighted card in primary color with the bot icon. This is the AI Entry Evaluator alert.
- Checkbox to enable.
- Sound type + duration + preview (same as above).
- A small purple/amber info note: "AI monitoring consumes a small amount of credits per trade per minute the trade is in zone — the exact rate varies by model and current pricing."
When ON, the AI Entry Evaluator runs every 60s while the trade is in zone, and fires this alert when (and only when) the AI approves entry.
Recommendation: keep both alerts ON. The zone alert tells you "price is here, pay attention"; the AI Entry alert tells you "and the AI says it's safe to enter". The combination is far more useful than either alone.
Alert Logic
Three options (a future RadioGroup, currently set at the agent level):
| Option | Trigger |
|---|---|
| zone_conditions (default) | Alert when (price in zone) AND (AI approves) |
| any | Alert when (price in zone) OR (AI approves) — useful if you want maximum coverage |
| buffer | Alert when price is within bufferPercent of the zone — useful for setups that often skip-trade through the zone |
bufferPercent defaults to 15% of the zone width.
Delivery Channels
Multi-select checkboxes:
- In-App Notifications — push to the browser tab (or PWA on mobile).
- Telegram Messages — requires linking Telegram via Settings.
- Webhook — POST to a URL you provide. Used for Zapier, Make, n8n integrations. The wizard shows the
WebhookSecurityNotereminder with HMAC signing details.
Webhook is also how the Trading Bridge gets its alerts — but the Trading Bridge channel is wired through Step 6 (Automated Trading), not here. Keep webhooks here for third-party integrations only.
Monitoring Lifetime
A select with options scoped by the user's trading mode:
| Trading Mode | Options |
|---|---|
| Intraday | 15 min, 30 min (recommended), 60 min, 90 min, 2 hours |
| Swing | 1 day, 3 days, 7 days (recommended), 14 days |
This is how long the agent will monitor each individual trade before flipping it to Expired. Should ideally match your scan interval — if you scan every 30 min, monitor for 30 min so trades don't overlap.
Helper text under the select reminds you when the AI validation kicks in:
- Intraday: "AI validates setup at 30 minutes".
- Swing: "AI validates setup every 24 hours".
Step 5 — Trade Filters
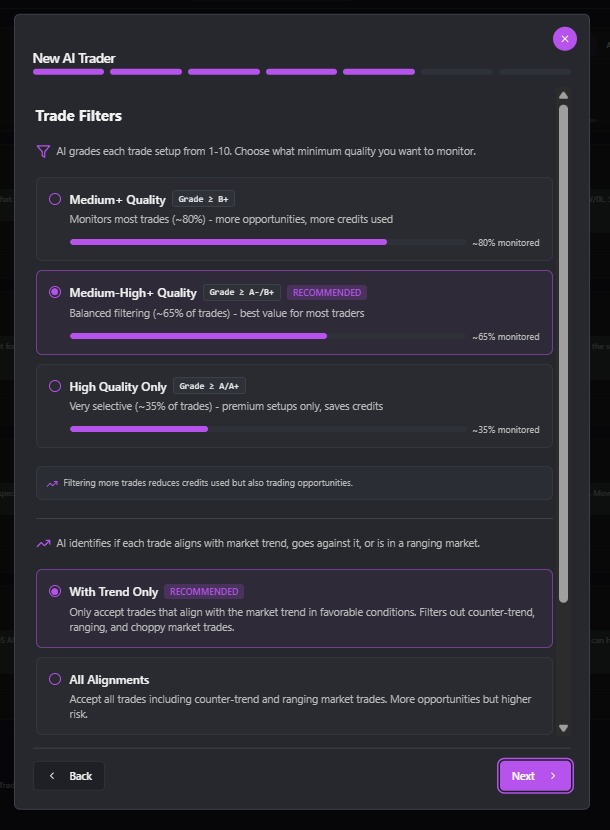
Two filter cards stacked vertically. Both default to the recommended setting.
TradeQualityFilterCard
The agent uses a confidence threshold to decide which setups to monitor. Three options:
| Threshold | Grade ≥ | Trades passing | Description |
|---|---|---|---|
| 5.0 | B+ | ~80% | Monitors most trades — more opportunities, more credits used |
| 6.5 (RECOMMENDED) | A-/B+ | ~65% | Balanced filtering — best value for most traders |
| 8.0 | A/A+ | ~35% | Very selective — premium setups only, saves credits |
Each option shows a progress bar visualizing the % monitored.
Trade-off curve: lower threshold = more opportunities + more credit burn + lower average grade. Higher threshold = fewer opportunities + lower credit burn + higher average grade. The recommended 6.5 is the inflection point where credit efficiency is best.
TrendAlignmentFilterCard
Whether to take trades that go against the prevailing trend.
| Option | Behavior |
|---|---|
| With Trend Only (RECOMMENDED) | Only accept trades that align with the market trend in favorable conditions. Filters out counter-trend, ranging, and choppy market trades. |
| All Alignments | Accept all trades including counter-trend and ranging market trades. More opportunities but higher risk. |
The card surfaces an "Alignment types" tooltip block explaining each label:
- With Trend — LONG in bullish market or SHORT in bearish market (higher probability).
- Strong Trend — established trend with high conviction (highest probability).
- Counter-trend — LONG in bearish market or SHORT in bullish market (higher risk).
- Ranging — no clear trend, sideways market (use caution).
- Weak Trend — directionally correct but unreliable trend (use caution).
- Choppy — directionally correct but poor market conditions (use caution).
Why "With Trend Only" is the default: counter-trend trades have a materially lower win rate across the historical sample. They can still be profitable if you have the right entry, but as a default for an autonomous agent they are a liability.
Step 6 — Automated Trading
Two cards. Both default to OFF. This is the step that decides whether the agent will fire orders into your broker or just notify you.
AutomatedTradingCard
A single checkbox: "Enable Automated Trading". Description: "Execute trades automatically when AI detects optimal entry conditions."
Benefits highlighted:
- No manual intervention — trade 24/7.
- Instant execution when conditions are met.
- Compatible with cTrader and MT5 via Trading Bridge.
When you check the box, the AutomatedTradingConfirmDialog opens with a serious warning: "By enabling automated trading you are authorizing this AI Trading Agent to place real orders in your broker account via the Trading Bridge. Lot size is computed from your configured risk per trade. SL and TPs are set by the AI's recommended levels." You confirm to enable.
State-based UI:
- If Trading Bridge not paired and you enable: blue warning card with two buttons — Download App (links to the bridge installer) and Connect (opens
TradingBridgeConnectionModal). - If Trading Bridge paired and you enable: primary-color card with a pulsing dot — "Trades will execute automatically when AI recommends entry."
Cross-link: see the Trading Bridge chapter of this guide for the full pairing and routing guide.
GradeAFastTrackCard
A toggle switch: "Auto-Approve A Setups". Description: "For high-quality setups (≥ 8 (eight or above) out of 10), use entry zone directly without verifying trigger conditions."
Below the description, an amber warning: "⚠️ Generates more signals but may amplify gains and losses."
What it actually does (in plain English):
- Normally, the agent requires two gates before firing an entry alert:
- Price enters the entry zone.
- The AI Entry Evaluator confirms the entry conditions (price action pattern, indicator confluence, no veto from the four hard gates).
- With Fast Track ON, for setups with confidence grade ≥ 8 (A or A+), the agent skips gate #2 — as soon as price enters the zone, the alert fires (and the Bridge fires the order).
The thinking: an A+ setup is by definition one the AI has high confidence in at the initial analysis. The entry-time re-evaluation is a safety check. For very high confidence setups, skipping the safety check is a calculated risk — you trade slightly more execution risk for materially better fill prices (you enter at the zone, not after the AI takes 60 seconds to confirm).
The four hard gates still act as a safety veto even with Fast Track on: if the open-position guard, news-blocking window, recent-loss gate, or same-direction loss gate fires, the alert is blocked.
Default OFF. Turn it on only after you have observed at least 30 closed A-grade trades from the agent and you are confident the AI's grading is well-calibrated for your instruments.
Step 7 — Cost Projection & Confirmation
The final gate before the agent goes live. Two components:
CostProjectionCard
A live estimate of how many credits this agent will consume per week and per month based on your current configuration. The numbers update as you change instruments, schedule, or filters.
How to read the estimate. Roughly speaking, 1 credit ≈ one full analysis. If the model takes a lighter pass — for example, when no setup is generated or the AI Entry Evaluator only needs a partial look — the credit cost is correspondingly lower. The true cost is token-based, so a single run can land anywhere from a fraction of a credit up to ~1 credit. The CostProjectionCard rounds these into a useful weekly / monthly bracket, but the figure is an estimate, not a guarantee.
What drives the cost up. More instruments per run, more runs per day, more days per week, lower quality filter (lets more setups through), and AI monitoring enabled all increase the projection. Removing any one of these brings it down.
Tier comparison
The card also shows:
- Your Monthly Plan — credit allowance for your tier (Free: 0, Lite: 0, Pro: 125, Elite: 200, Max: 350).
- Available Credits — your current balance.
- Upgrade button — if the projection exceeds your monthly allowance.
If totalMonthlyCredits > monthlyAllowance × 0.5, an amber tip appears: "This automation will consume a significant portion of your monthly plan. Consider reducing instruments or frequency."
CostConfirmation
A checkbox below the projection: "I understand this AI Trader will consume approximately X credits/week and Y credits/month." You must check this to enable the Launch AI Trader button. This is intentional friction — the system makes you acknowledge the cost before it provisions the agent.
Cross-link: see the Cost & Credits chapter of this guide for how credits work overall.
Automate Analysis Wizard (4 steps)
The simpler wizard for the Automated Analysis class. 4 steps.
Step 1 — Define Analysis
Name input + AI Model select + one of 4 templates:
Daily Analysis
Output format: complete market overview for day trading. Includes directional bias, key support/resistance levels, macro context (DXY, 10Y, VIX, $ADD), volatility assessment, today's news impact, and risk factors. No trade recommendations, analysis only.
When to schedule: 8:00 AM EST (before NYSE open) so it's ready when you start.
Key Levels & Zones
Output format: critical support/resistance from yesterday and last week, opening range high/low, pre-market levels, volume profile POC and value areas, plus the zones most likely to act as intraday pivots.
When to schedule: 9:00 AM EST so you have the levels mapped before the bell.
Structure Check
Output format: market structure (HH/HL or LH/LL), key support/resistance zones, trend strength via EMA alignment, structure breaks or retests in progress.
When to schedule: 3× per day (8:00 AM, 12:00 PM, 4:00 PM EST) for a continuous structure pulse.
Custom Prompt
A textarea. Write your own analysis prompt. Same tips as the AI Trader custom prompt apply.
If you ask for "trade setups" in a custom Automated Analysis prompt the AI will still generate them as cards — but they will not be auto-monitored. If you want monitoring, use the AI Trader wizard instead.
Step 2 — Instruments
Same InstrumentSelector as the AI Trader wizard. Same cost-per-instrument trade-off — but because Automated Analysis doesn't add monitoring credits, the cost is just runs × instruments × 1 credit each.
Step 3 — Schedule & News
Same TimeScheduler + NewsEventHandling components as the AI Trader wizard. The cost projection card is rendered here, not in a separate step — Automated Analysis is cheap and the wizard is simpler.
Step 4 — Notifications & Cost
The AnalysisNotifications component:
- In-App / Telegram / Webhook — same as AI Trader.
- Include chat link — the notification embeds a clickable link to the full chat thread.
- Include summary preview — the notification body includes a 2–3 sentence preview from the top of the analysis.
Plus the CostConfirmation checkbox to enable the Schedule Analysis button.
Lifecycle & Realtime
This section explains the actual mechanics behind everything you have read so far — what happens on the server when an agent runs, when a trade enters, and when a TP hits. You do not need this to use the hub, but you will be a far more effective user if you understand it.

Trade status timeline (the happy path)
Here is what happens between an agent producing a setup and the trade reaching its first take profit. Each step corresponds to a badge you can see on the trade card.
- Agent runs → a setup is generated. The trade card appears with the Alert ON badge.
- Price approaches the zone → still Alert ON. Nothing fires yet.
- Price enters the entry zone → badge flips to In Zone. The AI Entry Evaluator starts checking every 60 seconds.
- AI approves the entry → badge flips to AI Approved. One more confirming price tick is required before alerting you.
- Next price tick confirms → badge flips to Entry Signal. The Entry Alert fires (in-app + Telegram + Trading Bridge if configured).
- Trading Bridge fills the order at your broker → the trade goes live in the market.
- Price moves favorably and hits TP1 → the TP1 Hit badge appears.
- From there the trade continues toward TP2 and TP3, or reverses and hits SL.
How monitoring works (every 60 seconds)
Behind the scenes, a monitoring loop runs every 60 seconds. For each trade your fleet has armed, it pulls the latest 1-minute candle for the instrument, compares it against the entry zone, the stop, and each take profit — and updates the badge if anything has changed. Once price is inside the zone, that same loop hands the trade to the AI Entry Evaluator for a deeper look before any alert fires.
Why there is a small delay between AI approval and the alert
When the AI Entry Evaluator approves an entry, you see the AI Approved badge first — not an alert. The system intentionally waits for the next 1-minute price tick to confirm price is still in the zone before flipping to Entry Signal and firing the alert.
That tiny gap (typically up to 60 seconds) is by design: it gives a volatile candle a chance to retreat. If price hooks back out of the zone before the next tick, no alert fires. This trims false positives in fast markets without slowing down legitimate entries in calm ones.
Live updates without refreshing the page
The Trades tab stays in sync automatically. When a badge changes — a trade flips from In Zone to Entry Signal, a new setup appears, or a closed trade rolls off — the page updates in real time without a refresh. You can leave it open in a background tab and trust that what you see is current.
Catching up after a long pause
If you leave the app open in a background tab for more than a couple of minutes and come back, the page quietly refetches everything before you see it. This is a safety net for the very rare case where a real-time update was missed — when you return to the tab, the data on screen is guaranteed fresh.
Workflow Example — A Full XAUUSD Day
A worked example to tie everything together. Let's follow a single day with the XAUUSD Master AI Trader.
8:55 AM EST. You open the AI Trading Agents hub. The XAUUSD Master card shows SLEEPING state — next run in 35 minutes. The Performance Banner shows YTD 67% win rate across 142 closed trades, MTD 71% across 24. Looks healthy.
9:30:00 AM EST. The XAUUSD Master state icon switches to ANALYZING (pulsing brain). The Analysis Agent is reading the macro block, the trend block, the multi-timeframe candles, and the economic calendar.
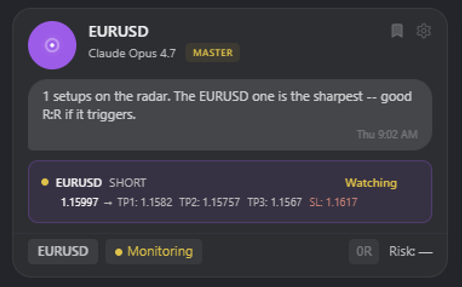
9:30:42 AM EST. A toast appears: "XAUUSD Master generated 1 setup." The state icon switches to MONITORING. A new trade pill appears on the card: [XAUUSD ↑] [Watching] Entry 2,648 → 2,651, TP1 2,659, SL 2,640. Grade: A (8.4). Trend Alignment: With Trend.
9:32 AM EST. You click the trade pill. The Trades tab opens, scrolled and highlighting this card. Direction LONG, Grade A 8.4, Trend Alignment "With Trend" (emerald), Trade Style Intraday. The embedded chart shows price at 2,646 — 2 dollars below the entry zone.
9:41 AM EST. Price ticks up to 2,648.20. The trade status flips from WAITING to IN ZONE. The card's AI Monitoring badge appears (small magenta pill). The trade pill on the Dashboard card now shows a yellow Watching dot. The yellow "In Zone, AI is evaluating" banner appears above the grid: "In zone, AI is evaluating: XAUUSD".
9:42 AM EST. The AI Entry Evaluator runs (you can see this in the AI History dialog). Decision: REJECTED. Reasoning: "Price tested the zone but no bullish confirmation pattern on 5m; RSI still neutral; waiting for either a bullish engulfing or RSI hook." The trade stays on the In Zone badge.
9:46 AM EST. Price ticks up to 2,650.10 — well into the zone. The AI Evaluator runs again. Decision: APPROVED. Reasoning: "Bullish engulfing on the 5m closed at 9:45; RSI hooked from 42 → 51; volume on the entry candle 1.4× average. Entry conditions confirmed."
9:46:02 AM EST. Badge flips to AI Approved. The card's status pill turns purple.
9:46:12 AM EST. Next 1-minute candle confirms price still at 2,650. Badge flips to Entry Signal. The emerald "AI Entry Confirmed" banner appears at the top of the grid: "AI Entry Confirmed: XAUUSD". The card's AI Entry Badge changes to "AI ENTRY APPROVED" (purple). An in-app toast fires with the configured sound. If you had Trading Bridge enabled, the order is fired into your broker right now.
9:46:14 AM EST. Bridge confirms fill at 2,650.30. The trade goes live in the market. Dashboard card state icon flips to TRADING (steady glow).
10:08 AM EST. Price hits TP1 at 2,659. Badge flips to TP1 Hit. The card's TP1 line shows a checkmark. Today P/L on the Dashboard card updates to +1.2R (green). If the Bridge has auto-TP enabled, 33% of the position closes.
11:14 AM EST. Price hits TP2 at 2,668. Badge flips to TP2 Hit. TP2 checkmark fills. Today P/L now +2.4R.
1:32 PM EST. Price retraces from TP2 area back toward 2,655. The Bridge had moved the SL to breakeven at TP2. SL hits at 2,660 (the trailed level). Badge flips to SL Hit. The card shows the trade as closed with outcome "TP2 HIT" badge (the highest TP reached). The card's TP3 line stays unchecked. Today P/L unchanged at +2.4R.
At end of day, the Performance Modal Activity tab for the XAUUSD Master shows 1 run, 1 trade, outcome +2.4R, AI approved entry, two TPs hit. The AI Insights panel (you have 145+ closed trades on this agent) updates its trend label to Stable: "Performance flat over last 30 trades. TP2 hit rate 71%, TP3 hit rate 22%, in line with 90-day average."
That is one day with one master. Multiply by 4 active masters and you understand why this hub is the heart of the daily workflow.
Trading Bridge from the hub
The Trading Bridge is the desktop app + broker bot combo that turns AI Entry alerts into real broker orders. The hub has two surfaces for it.
Per-trade "Automate" button
Every Trade Card has an Automate (purple) or Trading (orange) button in the footer. Click it to open the TradingBridgeConnectionModal scoped to this specific trade. From there you can:
- See the current pairing status of your Bridge.
- See whether this trade will be auto-executed (depends on the parent agent's
auto_execute_tradesflag). - One-shot send this specific trade to the Bridge for execution (even if the parent agent has auto-execute OFF).
This is the path for "I want to manually fire this one trade to the Bridge but I don't want to switch the whole agent to auto."
Wizard-level auto-execute toggle
The persistent setting is the Automated Trading card in Step 6 of the wizard (see the Generate Trade Ideas Wizard subsection). Toggling it ON wires the Trading Bridge into the alert delivery list for every future trade this agent produces.
Grade-A Fast Track recap
As described in Step 6 of the Generate Trade Ideas Wizard subsection, Fast Track skips the AI re-validation gate for setups with grade ≥ 8. The four hard gates still act as a safety veto — open-position guard, news-blocking window, recent-loss gate, same-direction loss gate. See the AI Entry Evaluator section of the AI Intelligence Agents chapter.
Cross-link to Trading Bridge chapter
The full guide to installing and configuring the Bridge — pairing, RoutingKey format, lot sizing, latency interpretation, troubleshooting — lives in the Trading Bridge chapter of this guide.
Best Practices & FAQ
Best practices
- Start with the 6 Masters. They are the highest-quality possible starting point. Run them for a full week before you build any custom agents.
- One instrument per agent (usually). The Masters do this. The AI's analysis quality is higher when it is focused on one market.
- Smart Scan AI is the right default strategy. Pick a typed strategy (Pullback / Breakout / Trend Continuation) only when you have a specific thesis about market regime.
- Keep grade filter at 6.5 (A-/B+). It is the best credit-efficiency point. Tighten to 8.0 only when you are credit-constrained.
- Keep Trend Alignment "With Trend Only". Counter-trend trades are a specialist game; do not run them in the background.
- Demo first. A full week in demo mode before flipping any Trading Bridge to live, with at least 5 closed trades in the demo period.
- Watch the AI Insights panel. A Degrading verdict is a prompt to investigate, not to delete.
- Use the Configure tab History modal. When something feels off, the answer is usually in the History.
- Match monitoring lifetime to scan interval. Scans every 30 min → monitor for 30 min. Otherwise you stack overlapping trades.
- Pin the agents you actively follow. The Pin icon on the Dashboard card keeps your most-watched agents at the top regardless of sort.
FAQ
Q: Why is my agent showing "SLEEPING" at 10:00 AM when it should run? A: Most likely the news-blocking window. Open the Configure tab, find the agent's schedule row — if it says "Skipped: News Block" the agent skipped because a high-impact event is within ±15 minutes. Check the Economic Calendar.
Q: Why did the AI reject an obvious A+ setup? A: Open the AI History dialog (FileText icon on the agent card). The AI's one-line reasoning is there. Common reasons: (1) entry pattern incomplete on the trigger timeframe, (2) one of the four hard gates fired (open-position guard, recent-loss gate), (3) the price spiked through the zone too fast for clean confirmation.
Q: What's the difference between "Pause Monitoring" and "Stop Monitoring" on a trade card?
A: Pause Monitoring halts the AI Entry Evaluator but keeps the trade alive — useful if you want to manually evaluate the entry. Stop Monitoring ends monitoring and transitions the trade to cancelled status. You can resume a stopped trade via the gear menu (Restart Monitoring).
Q: Can I delete a Master AI Trading Agent? A: No. Master AI Trading Agents can only be paused. The CannotDeleteMasterModal explains this. If you want a master out of your view entirely, pause it AND toggle "Show in Side Panel" OFF on the Configure tab.
Q: I edited the strategy on a Master and it's not changing. A: You cannot edit the strategy on a Master, only the notification settings. The strategy field is locked (you should see a small amber lock icon on the Edit modal). To customize the strategy, click "Build my own" from the LockExplanationPopover — this opens the wizard pre-filled with the master's config so you can create a custom agent that derives from the master.
Q: How much do credits cost? A: See the Cost & Credits chapter of this guide for the full breakdown. On average, 1 credit covers what the AI uses to produce a full analysis; AI monitoring adds a small amount of credits per trade per minute it's in zone (exact rate varies by model and current pricing).
Q: Can I have two agents running on the same instrument? A: Yes. They will produce independent setups (potentially overlapping). The open-position guard (one of the four hard gates) prevents two simultaneous live trades on the same instrument via the Bridge, but the monitoring layer will happily track both setups in parallel.
Q: The Trading Bridge says "amber WifiOff" — what does that mean? A: The Bridge heartbeat hasn't arrived in 20 seconds. The Bridge is probably restarting or your network blipped. If it goes red (60+ seconds), pause any agents with auto-execute on until the Bridge is back to green. See the Trading Bridge chapter of this guide.
Q: How do I know which model is best for my agent? A: Open the Performance Modal, Performance tab. Use the Model toggle at the top. If the agent has data from both Opus and Sonnet, the toggle lets you compare directly. Usually Opus wins on complex setups (NAS100, XAUUSD); Sonnet ties or beats Opus on cleaner trend instruments (USDJPY, EURUSD) at a fraction of the credit cost.
Q: What happens if I run out of credits mid-month? A: Scheduled runs are blocked until either your tier resets (1st of the month) or you top up. Trades already being monitored continue to be monitored (monitoring credits are deducted at decision-time, not per-tick). Read the Cost & Credits chapter for full rules.
Glossary
| Term | Definition |
|---|---|
| AI Trading Agent | A configured, persistent piece of intelligence in the AI Trading Agents hub that scans the market on a schedule and produces trade setups (and optionally executes them via the Trading Bridge). Two classes: AI Trader and Automated Analysis. |
| Automation | Legacy term for AI Trading Agent. Kept in some body copy for backward compatibility. Automation = AI Trading Agent. |
| AI Trader | An AI Trading Agent that produces trade setups, auto-monitors them, and can optionally auto-execute via the Trading Bridge. |
| Automated Analysis | An AI Trading Agent that produces a markdown chat report on a schedule. No setups, no orders. |
| Master AI Trading Agent | One of 6 hand-tuned agents shipped with paid tiers. Cannot be deleted, only paused. Strategy and instruments are locked; notifications are editable. |
| R-multiple (R) | The ratio of profit/loss to risked amount. A trade that risks $100 and makes $240 is +2.4R. R-multiples make P/L comparable across instruments and account sizes. |
| PS% | AI-recommended Position Size %. Maps to a lot size ladder: ≥70%→100%, ≥50%→75%, ≥30%→50%, else 25% of your base size. |
| Avg R | Average R-multiple across closed trades. The single most useful performance metric. >+0.5R sustained is excellent. |
| In Zone | Trade status meaning price has entered the entry zone. The AI Entry Evaluator runs every 60s. |
| AI Entry | The decision made by the AI Entry Evaluator when price is in the zone. APPROVED → entry alert fires (and Bridge fires order). REJECTED → keep monitoring. |
| Grade | The confidence grade the AI assigned at setup creation time. A+ (9.0–10.0), A (8.0–8.9), B+ (7.0–7.9), B (6.0–6.9), C (<6.0). |
| Trend Alignment | Whether the trade goes with or against the prevailing trend. Labels: With Trend, Strong Trend, Counter-trend, Ranging, Weak Trend, Choppy. |
| Trade Quality Filter | The agent-level confidence threshold below which setups are not monitored. Three options: 5.0 (Medium+), 6.5 (Medium-High+, recommended), 8.0 (High only). |
| Grade-A Fast Track | Optional setting that lets the agent skip the AI re-evaluation gate for setups with grade ≥ 8. Faster entries, slightly more execution risk. |
| Smart Scan AI | The recommended strategy. The AI dynamically picks pullback / breakout / trend continuation / mean reversion per run based on current market conditions. Used by all 6 Masters. |
| Performance Banner | The 4-column TODAY/WTD/MTD/YTD strip at the top of the Dashboard tab. Aggregates fleet win rate and counts. |
| Performance Modal | The 4-tab analytics modal (Activity, Performance, Trades, Strategy) opened from any performance card. The deepest analytics surface in the hub. |
| AI Insights | Self-analysis panel on the Strategy tab of the Performance Modal. Only appears with ≥10 closed trades. Includes trend label (Improving / Stable / Degrading) and recommendations. |
| Trading Bridge | Desktop app + broker bot combo that turns AI Entry alerts into real broker orders. Supports cTrader and MT5 (both via bots). |
| Heartbeat 20s | The Trading Bridge sends a heartbeat every 20 seconds. Amber = no heartbeat for 20s. Red = no heartbeat for 60s. |
| RoutingKey | The <SYMBOL>-<BROKER> string the Bridge uses to route an order to the correct broker bot (e.g., US30-Pepperstone). |
| scheduled_analyses | The database table holding one row per AI Trading Agent configuration. |
| trade-monitor | The 60s cron edge function that flips trade statuses and triggers the AI Entry Evaluator. |
| alert-dispatcher | The edge function that delivers entry alerts to In-App / Telegram / Webhook / Trading Bridge channels. |
| Realtime | Supabase Realtime subscription mechanism that makes the Trades tab update without a page refresh. |